New: Academic Computing Drop-in Sessions
Academic computing drop-in sessions are now run by members of our team on Wednesday afternoons! Head to our drop-in info page for details & schedule....
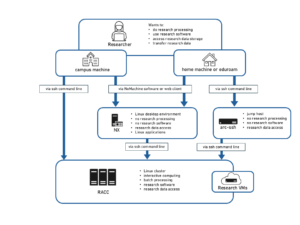
GitLab is a web-based Git repository server that allows you to securely store, version, and collaborate on projects. It supports features such as issue tracking, continuous integration, and project management tools.
The University of Reading GitLab server can be accessed with your standard username and password here: https://gitlab.act.reading.ac.uk
General documentation on the use of GitLab can be found in the help section of our GitLab server.
Git novices may find the Software Carpentry short course on Version Control with Git very useful as a starting point for learning git commands.
When you’re committing your code to gitlab.act.reading.ac.uk from a directory on our Linux storage, e.g. your home directory /home/users/username, you’ll be asked for your UoR password. Entering it every time you want to commit a change can be bothersome and ssh keys are a convenient and secure authentication method to use instead.
The full setup guide to ssh keys on can be found on the GitLab instructions page, but we have produced a short step-by step example on how to do this in your home directory below. The example generates ssh keys on the RACC2, but you can also do this on our other Linux servers, e.g. arc-ssh. The key needs to be only generated once on one of our systems in your home directory.
1. Connect to the RACC2. If you’re unsure how to do this, take a look at our RACC2 documentation.
2. Generate a set of ssh keys with the following command, sticking to all defaults as it runs (simply press the “enter” key each time):
[dk913223@racc2-login-3 ~]$ ssh-keygen -t ed25519 -C "GitLab ssh key"
In the above command the option -t ed25519 denotes the ED25519 ssh key algorithm, which GitLab recommends. You can, however use other algorithms, such as our system default, RSA, for which you can simply remove the -t ed25519 option from the above command. For more details see the GitLab instructions page. -C “GitLab ssh key” is simply a comment to help you identify what purpose you generated this key for but this is optional.
The screen output will tell you that the key has successfully generated ssh keys. If you stuck with the default options, for the above command will have put your public key in this file: /home/users/username/.ssh/id_ed25519.pub.
3. Copy the contents of the /public key file to your clipboard.
4. In a web browser connect to https://gitlab.act.reading.ac.uk
5. On the left sidebar, select your avatar, then select “Edit profile”, as seen in the image below.
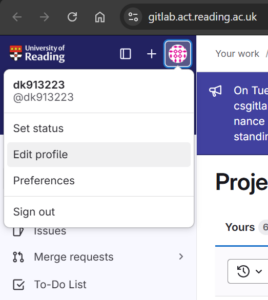
6. Next, select ‘SSH Keys and then ‘Add New Key’. In the key box, paste the contents of your public key. If you manually copied the key, make sure you copy the entire key, which in the above example starts with ssh-ed25519. In the ‘Title’ box, enter a name for your key. You can leave the rest as default, deciding whether you want your key to expire after a certain date or not. Then click ‘Add key’.
7. Verify that your ssh keys were added correctly by trying to connect to gitlab from the RACC2 with the following command:
[dk913223@racc2-login-3 ~]$ ssh -T git@gitlab.act.reading.ac.uk
X11 forwarding request failed on channel 0
Welcome to GitLab, @dk913223!
If you see the welcome message as shown above, your ssh keys have been setup correctly.
This section contains a brief summary of git commands used to create your first repository. This is just a brief example guide, the Software Carpentry short course on Version Control with Git is recommended to familiarise yourself with git commands if you’re new to version control.
On the Linux storage, in e.g. your home directory, create or go to the directory of your code that you want to commit to GitLab. In that directory, initialise git with the following command:
[dk913223@racc2-login-3 ~]$ git init
Then, all files that exist in that directory can be added and committed to git with the commands below:
[dk913223@racc2-login-3 ~]$ git add .
[dk913223@racc2-login-3 ~]$ git commit -m "Create initial repository"
The -m flag (for “message”) is used to record a short and specific comment that will help us remember later on what we did and why.
Next, you can upload, or “push” your files to GitLab, creating a project. Substitute your UoR username and a name for your project in the command below:
git push --set-upstream git@gitlab.act.reading.ac.uk:<your username>/<your project name>.git master
You can add this remote repository to your local Git repository with the following command, again substituting your UoR username and a name for your project below. Here, we used “origin” to name the repository, but you can choose your own.
git remote add origin git@gitlab.act.reading.ac.uk:<your username>/<your project name>.git
After setting up the above, subsequent git push commands work like this:
git push origin
Note that the new created project is set to private by default. If you wish to make your project public to share with others, you can change the permissions of it on https://gitlab.act.reading.ac.uk/<username>/<project name>).