New: Academic Computing Drop-in Sessions
Academic computing drop-in sessions are now run by members of our team on Wednesday afternoons! Head to our drop-in info page for details & schedule....
Use the following procedure to start Jupyter Notebook on the RACC or RACC2.
module load anaconda
jupyter notebook
Jupyter Notebook can also be launched from anaconda-navigator (See Python on the Academic Compute Cluster). Further information about Jupyter Notebook can be found in the official Jupyter/Ipython Quick Start Guide.
We created a script and launcher that automates the ssh tunnel approach described below. The script is provided as is, without support. To use it without the need to enter your password multiple times, you need to set up ssh keys, such that you can login from NX to RACC2 without entering the password. You can run the script from the command line:
nxnode:~$ jupyter_on_RACC2.sh
Or you can use the GUI launcher, as shown in the screenshot:
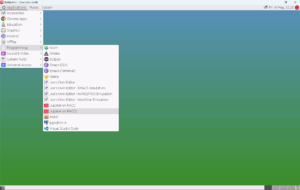
The Firefox browser opened by the script uses a separate profile and it should not be used for any other tasks, as it will be closed together with Jupyter Notebook.
If you use VPN or ssh multiplexing on Linux or Mac, you can also try using the script from home. The script will test if it can connect to racc.rdg.ac.uk without entering password or It will look for a master connection called arc-ssh (see arc-ssh for Linux and Mac users – step by step guide). In this case you might need to enter your UoR username:
homeMachine:~$ jupyter_on_RACC2.sh <UoR user name>
Using Jupyter Notebook via SSH tunnels might result in a more responsive user experience, but this approach is not supported by DTS. The following information might be useful to some experienced users but we do not promise it will work, and DTS is not able to help if you have any difficulties.
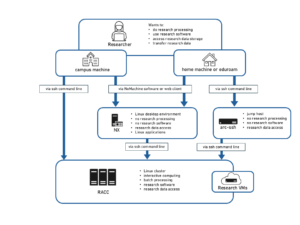
In this article we will use MobaXterm to connect to the RACC and we will launch jupyter notebook on one of the login nodes. Normally jupyter notebook is only available to be open in a web-browser on the localhost, for security reasons. In order to be able to connect to jupyter notebook running on the login node from the web-browser running on your Windows machine (the procedure for Linux or Mac client is similar) we will need an ssh tunnel. We will create the tunnel from another MobaXterm tab. This procedure will only work from computers connected to the wired network on campus or using VPN, or with replacing using act-ssh when connecting from home – see the end of the document.
When you connect to cluster.ac.rdg.ac.uk your session does not run on a server called ‘cluster.ac.rdg.ac.uk’, it runs on one of the five login nodes, racc-login-0-1 – racc-login-0-5. The nodes are allocated automatically by a load balancing algorithm. The nodes are intentionally not registered in DNS. When you create the ssh tunnel to jupyter running on one of the login nodes, you will need to find its IP address and use it to connect to this node, not cluster.ac.rdg.ac.uk which is just a session broker. Another option is to connect via cluster.act.rdg.ac.uk or via act-ssh (when working from home), as those systems know the IP addresses of the login nodes. Please do not use this workaround to connect directly to the login node in any other circumstances, you should always use cluster.act.rdg.ac.uk to allocate your session.
[qx901702.smpc115] ➤ ssh qx901702@cluster.act.rdg.ac.uk -Y

[qx901702@racc-login-0-2 ~]$ module load python2.7/anaconda/5.3.1
[qx901702@racc-login-0-2 ~]$ jupyter notebook --no-browser
[I 18:43:52.128 NotebookApp] The port 8888 is already in use, trying another port.
[I 18:43:52.129 NotebookApp] The port 8889 is already in use, trying another port.
[I 18:43:52.129 NotebookApp] The port 8890 is already in use, trying another port.
[I 18:43:52.247 NotebookApp] JupyterLab extension loaded from /share/apps/python/python2.7/anaconda2-5.3.1/lib/python3.6/site-packages/jupyterlab
[I 18:43:52.247 NotebookApp] JupyterLab application directory is /share/apps/python/python2.7/anaconda2-5.3.1/share/jupyter/lab
[I 18:43:52.250 NotebookApp] Serving notebooks from local directory: /home/users/qx901702
[I 18:43:52.250 NotebookApp] The Jupyter Notebook is running at:
[I 18:43:52.250 NotebookApp] http://localhost:8891/?token=17e0057af51fe49b73f173224960715ae72bc7b2fd43c965
[I 18:43:52.250 NotebookApp] Use Control-C to stop this server and shut down all kernels (twice to skip confirmation).
[C 18:43:52.259 NotebookApp]

    To access the notebook, open this file in a browser:
        file:///run/user/8822/jupyter/nbserver-34864-open.html
    Or copy and paste one of these URLs:
        http://localhost:8891/?token=17e0057af51fe49b73f173224960715ae72bc7b2fd43c965
In the path given by jupyter we see that the port number is 8891. We are on racc-login-0-2. Note that in your case the login node and the port number will be different.
[qx901702.smpc115] ➤ ssh -J qx901702@cluster.act.rdg.ac.uk qx901702@racc-login-0-2 -L localhost:8891:localhost:8891 -N
Please make sure you terminate all your jupyter notebook processes when you finish. Runaway jupyter processes are causing a lot of problems on the login nodes.
One option is using VPN. Another possibility is connection via arc-ssh, see also arc-ssh with MobaXterm – step by step guide. To make it easier, arc-ssh is now set up to know the IP addresses of the RACC login nodes, and the flag ‘-J <username>@arc-ssh.reading.ac.uk’ can be used instead of ‘-J <username>@cluster.act.rdg.ac.uk’. This is what you need to change when connecting via arc-ssh:
1. To connect to the cluster, use the command like:
[homePC] ➤ ssh -J qx901702@arc-ssh.reading.ac.uk qx901702@cluster.act.rdg.ac.uk -Y
2. To create the ssh tunnel, use the command like:
[homePC] ➤ ssh -J qx901702@arc-ssh.reading.ac.uk qx901702@racc-login-0-2 -L localhost:8891:localhost:8891 -N