New: Academic Computing Drop-in Sessions
Academic computing drop-in sessions are now run by members of our team on Wednesday afternoons! Head to our drop-in info page for details & schedule....
 Externally visible ssh server – act-ssh
act-ssh.reading.ac.uk is now replaced by arc-ssh.reading.ac.uk. The main reason for this change is to make using the service easier. The new system is easier to use, the main improvements are:
Please refer to the instructions for arc-ssh. The instructions below is obsolete and will be removed when act-ssh is switched off.
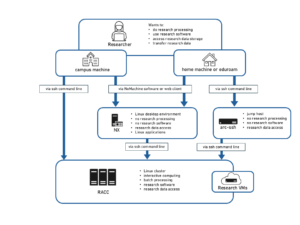
act-ssh.reading.ac.uk is an externally visible ssh server. It is available to the registered users and if you are not already an act-ssh user you need to raise a ticket FAO Academic Computing Team for access to be granted. It can be used 1) as a ‘jump host’ or proxy allowing to connect to other UoR systems, and to work interactively, e.g. to RACC, or 2) for one-step data transfers using rsync, scp, sftp etc., all research data storage is mounted on act-ssh.
In this article, you will find instructions on how to:
New updates:
Before you begin:
act-ssh is just one of the options to connect from off campus and to transfer data from off campus, for other options see the Knowledgebase article listing all options to connect from off campus and the Managed File Transfer service.
To connect to act-ssh.reading.ac.uk from off-campus, a two factor authentication is required. You will need to authenticate with an Authenticator app or with an ssh key first, and then you will be prompted for your UoR password. We strongly recommend that you get familiar with both methods and that you follow the instruction and set up the Google Authenticatior authentication first, and then use this method of authenticating to transfer your ssh keys. Once you will have your ssh keys set up, you can use further instructions where we show how you can automate connections on Windows and on Unix – act-ssh with MobaXterm – step by step guide and act-ssh for Linux and Mac users – step by step guide. From trusted ACT systems e.g. NX or RACC, you can authenticate just with the UoR password, or just with the ssh key, like to any other UoR Unix system. Such single factor authentication connection will need to be used to connect to act-ssh in order to set up Authenticator and/or ssh key authentication for off campus two factor authentication.
To set up off-campus access with 1. Google Authenticatior (the Microsoft Authenticator app can be used), or with 2. ssh keys, you will need to connect from a trusted host on campus first. The simplest solution from off campus is the NX web player https://nx.reading.ac.uk:4443, (alternatively users with access to the VPN can now use the VPN to connect to act-ssh with single factor authentication). Once you have logged in to the NX desktop, launch mate-terminal and type:
qx901702@nxnode3:~$ ssh act-ssh.reading.ac.uk
After the policy warnings you will see
******************************************************************************
* On campus connection, login with ssh key or with UoR password              *
* Set up you two factor authentication for off-campus access                 *
******************************************************************************
qx901702@act-ssh.reading.ac.uk's password:
This message will be different when you connect from off-campus to help avoiding any confusion regarding the expected authentication methods.
The general idea of Google Authenticator is quite simple. A secret key is placed in a file on the server. On the ACT systems using this method of authentication the file is located at /var/authenticator/<UoR username>/.google_authenticator. The secret key is transferred to your mobile device when you scan the QR code (you can also achieve this by copying the secret key by hand), and it is stored in the authenticator app. Those secret keys on both sides, plus the current time, are used to generate the time based verification codes, and comparing those verification codes confirms the identity of the device used to authenticate the connection.
You need to install the Microsoft Authenticator app (this is recommended because it is already used with other UoR services) or the Google Authenticator app on your phone. Both Google and Microsoft apps are compatible with Google Authenticator service and the following setup steps are the same in both cases. Once the app is installed, run the configuration script on act-ssh and follow the instructions. In the app, you will need to scan the QR code displayed on the computer screen. The configuration script is modified to store the Authenticator files locally on act-ssh, not in your shared home directory and setting it up on act-ssh will not affect how you login to other UoR services. The script is now amended to provided default values for all the parameters, and you will not have to answer any configuration questions.
[qx901702@act-ssh ~]$ google-authenticator
Do you want authentication tokens to be time-based (y/n) y
Warning: pasting the following URL into your browser exposes the OTP secret to Google:
https://www.google.com/chart?chs=200x200&chld=M|0&cht=qr&chl=otpauth://totp/qx901702@oak2%xxxxxxxxxxxxxxxxxxxx
Your new secret key is: xxxxxxxxxxxxxxxxxxxxxxxxxxxxxxx
Your verification code is xxxxxxx
Your emergency scratch codes are:
  Xxxxxxxx
  xxxxxxxx
  xxxxxxxx
  xxxxxxxx
  xxxxxxxx

Do you want me to update your "/var/authenticator/qx901702/.google_authenticator" file? (y/n) y

Do you want to disallow multiple uses of the same authentication
token? This restricts you to one login about every 30s, but it increases
your chances to notice or even prevent man-in-the-middle attacks (y/n) y

By default, a new token is generated every 30 seconds by the mobile app.
In order to compensate for possible time-skew between the client and the server,
we allow an extra token before and after the current time. This allows for a
time skew of up to 30 seconds between authentication server and client. If you
experience problems with poor time synchronization, you can increase the window
from its default size of 3 permitted codes (one previous code, the current
code, the next code) to 17 permitted codes (the 8 previous codes, the current
code, and the 8 next codes). This will permit for a time skew of up to 4 minutes
between client and server.
Do you want to do so? (y/n) y

If the computer that you are logging into isn't hardened against brute-force
login attempts, you can enable rate-limiting for the authentication module.
By default, this limits attackers to no more than 3 login attempts every 30s.
Do you want to enable rate-limiting? (y/n) y
[qx901702@act-ssh ~]$
The following video shows the procedure on the Linux side (in the NX remote desktop). On the phone, you just scan your QR code, such as the one visible in the video, in the Authenticator app.
[pawel@homepc] ➤ ssh act-ssh.reading.ac.uk -Y
After the policy message you will see a message informing you that this is a Google Authenticator connection. If the correct verification code is not provided, the subsequent UoR password authentication will fail.
******************************************************************************
* Authenticate with google authenticator and then with UoR password          *
* If you do not see the 'Verification code:' prompt                          *
* it means google authenticator is not configured for this account           *
******************************************************************************
Verification code:
Password:
Last login: Tue Jul 23 19:33:56 2019 from nxnode3.rdg.ac.uk
[qx901702@act-ssh ~]$
Connections with ssh key authentication are accepted on port 2222 (default ssh port is 22). You need to generate an ssh key pair on your home machine and place the public key in your .ssh/authorized_keys file in your UoR Unix home directory. Below is the short instruction that is not specific for any particular operating system and ssh client. This might be useful for users experienced with using ssh, especially if they have a different preferred ssh client to those that are recommended by us, i.e. MobaXterm on Windows and OpenSSH client which is default on Linux and Mac. Most users will benefit from treating the rest of this page as an introduction and then move on to using the detailed instructions linked at the end of this article to set up their own systems.
The most straightforward and convenient approach is that you have already set up Google Authenticator authentication, point 1, and we will use it here. Another easy option is to run those command when connected to the VPN, such that the two factor authentication is not required.
[pawel@homepc] ➤ ssh-keygen
[pawel@homepc] ➤ ssh-copy-id <UoR user name>@act-ssh.reading.ac.uk
Verification code:
Password:
We recommend you use this method as it automatically puts you public key in the right file and, if needed, it corrects directory permissions as required for ssh connection to work. Note that it you specify a non-standard name for you private key, you will need to explicitly provide this name to the ssh command (and to the ssh-copy-id command as well).
If you cannot use the Authenticator app or the VPN, you can still set up your ssh keys following a slightly more complex procedure. One option is the NX webplayer, you could e.g. just use copy and paste to transfer your public ssh key (the content of the file) from local system to your .ssh/authorized_keys file on the UoR system (here, the NX desktop). Another option is to use scp and mft.act.reading.ac.uk. We will show the scp approach here, because it is easier to present this as a series of Unix commands. Let’s generate the ssh keys on the home PC:
[pawel@homepc] ➤ ssh-keygen
To add the public ssh key to the .ssh/authorized_keys file on the server, we will bring this file from the server, append the key, and push the updated file back to the UoR systems. We assume that you already have ~/.ssh/ directory in your UoR home directory, if not you need to create it. This directory is created automatically when you connect with ssh for the first time, so if you have ever connected to any UoR Unix system via ssh you have the directory. If there is no .ssh/authorized_keys file on the server, and this will be the case if you did not install any public ssh key yet, the first command will fail, but you can continue, the second command will just create the output file if it does not exists.
[pawel@homepc] ➤ scp <UoR user name>@mft.act.reading.ac.uk:/<UoR user name>/.ssh/authorized_keys ./
Password:
authorized_keys                               100% 5971    27.1KB/s   00:00
[pawel@homepc] ➤ cat ~/.ssh/id_rsa.pub >> authorized_keys
[pawel@homepc] ➤ scp authorized_keys <UoR user name>@mft.act.reading.ac.uk:/<UoR user name>/.ssh/
Password:
authorized_keys                               100% 6367     6.2KB/s   00:01
[pawel@homepc] ➤ rm authorized_keys
Now you can connect on port 2222 with ssh key authentication:
[qx901702@homepc] ➤ ssh qx901702@act-ssh.reading.ac.uk -Y -p2222
Again you will see the security prompt and then the authentication instruction:
******************************************************************************
* Authenticate with with ssh key and then with UoR password                  *
* If you get 'Permission denied' possibly you have not setup your ssh keys   *
******************************************************************************
After a successful ssh key authentication you might see (with majority of ssh clients you need the flag -‘v’ to see this)
Authenticated with partial success.
and you will be prompted for your UoR password. Note that ssh key authentication might not work if the permissions on all relevant files and directories, including your home directory, are not correct.
On a trusted home machine you can save your ssh private key and allow MobaXterm to cache your password for a fully automatic password-less connection. CAUTION: If you are using an untrusted machine, do not save your private key and be careful to not allow for your password to be cached on it.
More details on connection from home with using ssh keys are provided at act-ssh with MobaXterm – step by step guide and act-ssh for Linux and Mac users – step by step guide.