New: Academic Computing Drop-in Sessions
Academic computing drop-in sessions are now run by members of our team on Wednesday afternoons! Head to our drop-in info page for details & schedule....
 act-ssh with MobaXterm – step by step guide
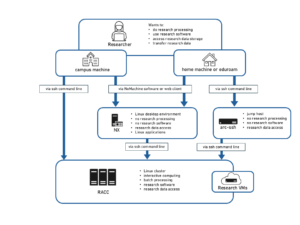
In this step by step tutorial we will set up ssh key authentication to act-ssh – we will create an ssh key pair on the home machine and than we will copy the public key to the UoR systems. It is recommended that before you start with this tutorial, you already have Google Authentication set up, as shown on the act-ssh landing page, because we will use this method to authenticate to act-ssh when copying the public key. However, if you cannot use the authenticator app, an alternative, more complex way of achieving the same result with use of MFT will be shown as well. The next part of the tutorial – configuring clickable sessions, and using act-ssh as a jump host for various purposes is not necessary to connect to RACC or to transfer files to RACC, but it will allow you to automate routine steps, e.g. connecting to RACC. NX users might find it handy to see how to use an ssh tunnel or tunneled SOCKS proxy to access NX with the full NoMachine client. Some but not all users will find it useful to see the part how to connect to virtual desktops and office PCs, or how to use act-ssh to access SMB (Windows) shares. For some users, the approach presented in this article might be a replacement for using VPN (and will allow to connect to systems not accessible from VPN). In the screenshots below, the username qx901702 is used, please replace it with your own username for your connection.
Linux and Mac users: see also the twin article act-ssh for Linux and Mac users – step by step guide.
Let’s download and install the most recent version of MobaXterm, use the installer version, not the portable version. Some older versions have problems with using ssh keys.
A video showing this procedure is available at the end of this section.
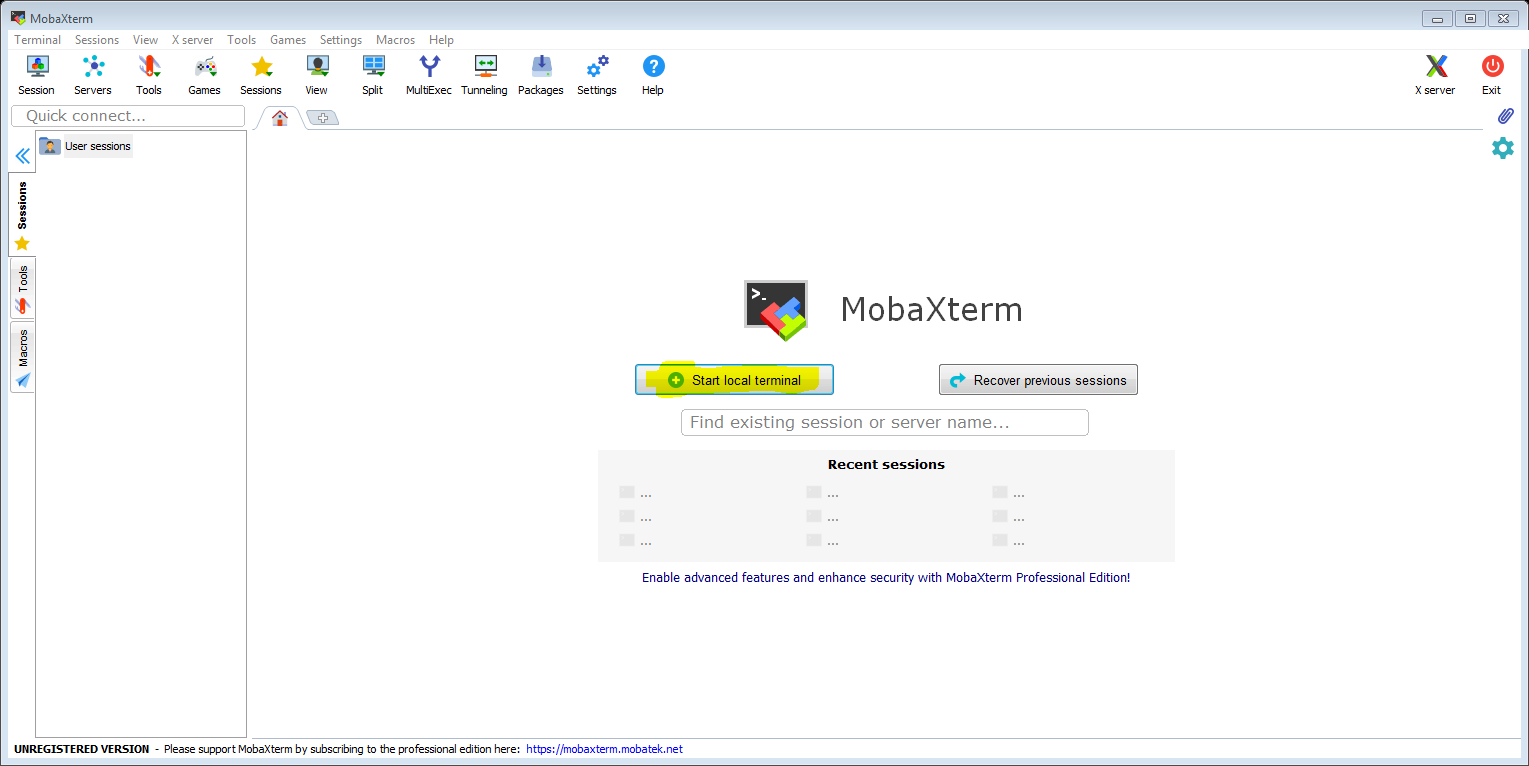
Launch MobaXterm and click ‘Start local terminal’. The local terminal provides a Unix shell environment on your Windows PC, and it includes ssh.
In the terminal we generate the ssh keys and transfer the public key to the UoR Unix home directory. This part is not specific to MobaXterm, the same commands can be used on Mac and on Linux. Here we just show it in MobaXterm, with screen shots.
In the terminal we just need to type two commands – one to generate the ssh keys on your home machine (if you do not have them yet) and the second command to transfer the public key to act-ssh.
With the command ssh-keygen we create two files on the local machine, your private and public ssh keys: id_rsa and id_rsa.pub. At the prompt ‘Enter file in which to save the key’, we leave it blank, i.e. we agree to the default: id_rsa. The private key stays only on your local machine and you need to protect it from being discovered by third parties as it is like a password. The public key is something that you can share and you place it on the remote system. It will be used to confirm your identity when you connect to the remote system.
The command ssh-copy-id will take your public ssh key, connect to the destination machine, here act-ssh.reading.ac.uk, and it will append the public key to the ~/.ssh/authorized_keys file. All will happen automatically, and the command will take care to set up the right permissions on the relevant files and directories.
So the commands that the use ab123456 would need to type into the mobaxterm shell would be:
ssh-keygen
ssh-copy-id ab123456@act-ssh.reading.ac.uk
Skip to the next section if you used method 1.
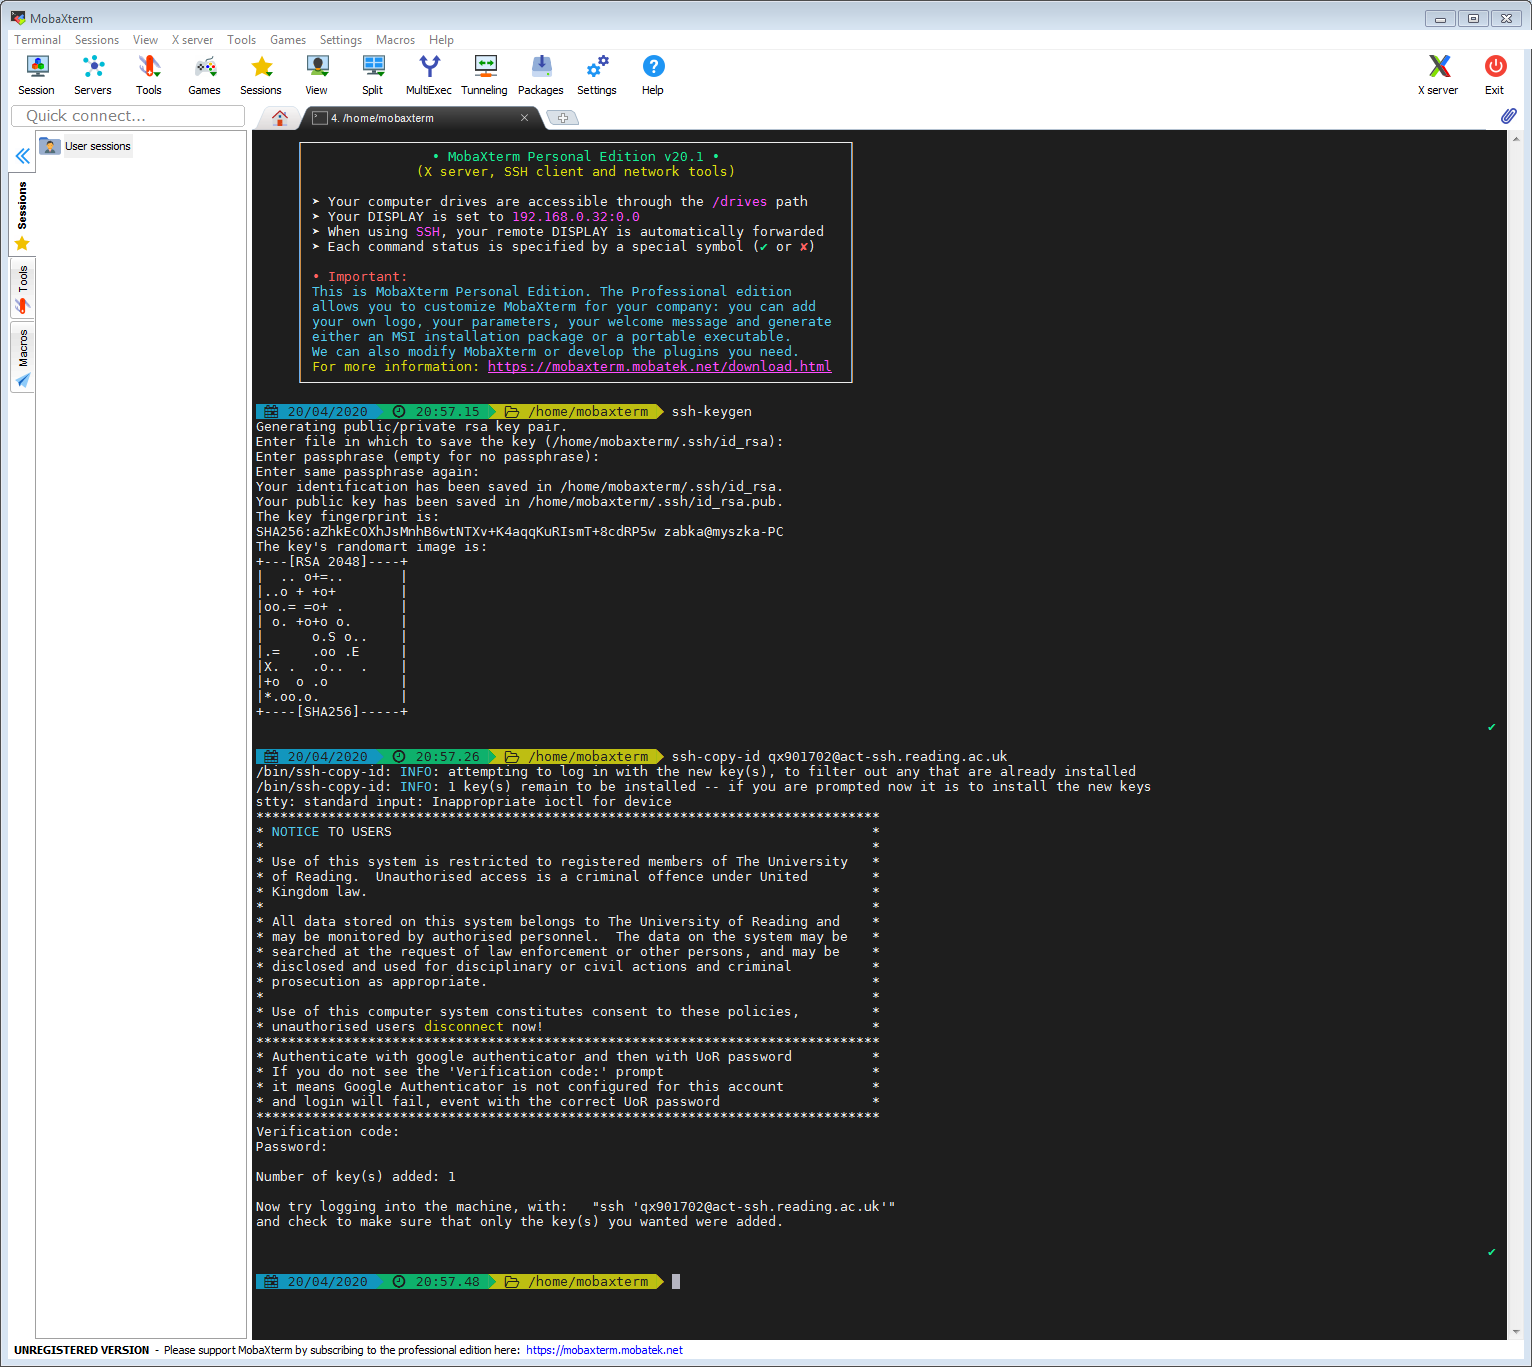
Here we will transfer the key using mft.act.reading.ac.uk, which allows scp and sftp connections and doesn’t require VPN for these. You can authenticate to MFT with your UoR password, two factor authentication is not needed. This method requres some Unix skills, in case of any difficutlies please use method 1.
On the remote server we need to append your public key, here id_rsa.pub, to the ~/.ssh/authorized_keys file. Here the remote site is the whole UoR Unix infrastructure with a shared Unix home directory, and you place the file in ~/.ssh/authorized_keys in your Unix home directory (authorized_keys can contain many keys). We cannot edit the file via MFT, so we copy the original from our Unix home directory to the local system, append the key and then copy the amended file back to our UoR Unix home directory. We assume that you already have the ~/.ssh/ directory in your UoR home directory. Most users have it, because it is created automatically when you connect with ssh to any UoR Unix system. However, if you do not have the directory ~/.ssh/, you will need to create it first, e.g. using sftp, because otherwise the second scp command will fail. We do not describe creating the directory ~/.ssh here, and if you have any difficutties, please use method 1. If you do not have the authorized_keys file in your UoR home directory the first scp command will fail but this is not a problem; the following ‘cat’ command line will create the authorized_keys file if it does not exist.
Troubleshooting tips:
If this doesn’t work, a common problem are wrong permissions on the directory ~/.ssh or on the file ~/.ssh/authorized_keys (in case of manual setup, ssh-copy-id will take care of permissions automatically). They should be:
[qx901702@nxhode ~]$ ls -ld ~/.ssh/ ; ls -l ~/.ssh/authorized_keys
drwx------ 4 qx901702 sms 17 Apr  1 20:15 /home/users/qx901702/.ssh/
-rw------- 1 qx901702 sms 7953 Mar 30 19:30 /home/users/qx901702/.ssh/authorized_keys
You can fix it with the commands:
[qx901702@nxnode ~]$ chmod 700 /home/users/qx901702/.ssh
[qx901702@nxnode ~]$ chmod 600 /home/users/qx901702/.ssh/authorized_keys
Once you have the public key copied to the UoR systems, you can connect to act-ssh on port 2222. act-ssh requires two factor authentication, on port 2222 it uses ssh key authentication and then UoR password authentication. With our ssh key ready, we will just need to type the password and we are logged in. If you allow MobaXterm to cache your password, subsequent logins will not require typing password at all. From act-ssh you can further connect to ather UoR systems, e.g. to cluster.act.rdg.ac.uk.

The whole procedure, from creating and installing the ssh keys to connecting to act-ssh is shown in the video:
On act-ssh you can access all your data volumes. This includes your Unix home directory and research data storage mounted on /storage and SMB (Windows) shares as well. The SMB shares are mounted on /dfs/<user name> (just on act-ssh and only when you connect on port 2222). From act-ssh you can also connect to other systems, e.g. you can connect to RACC. See this in the video:
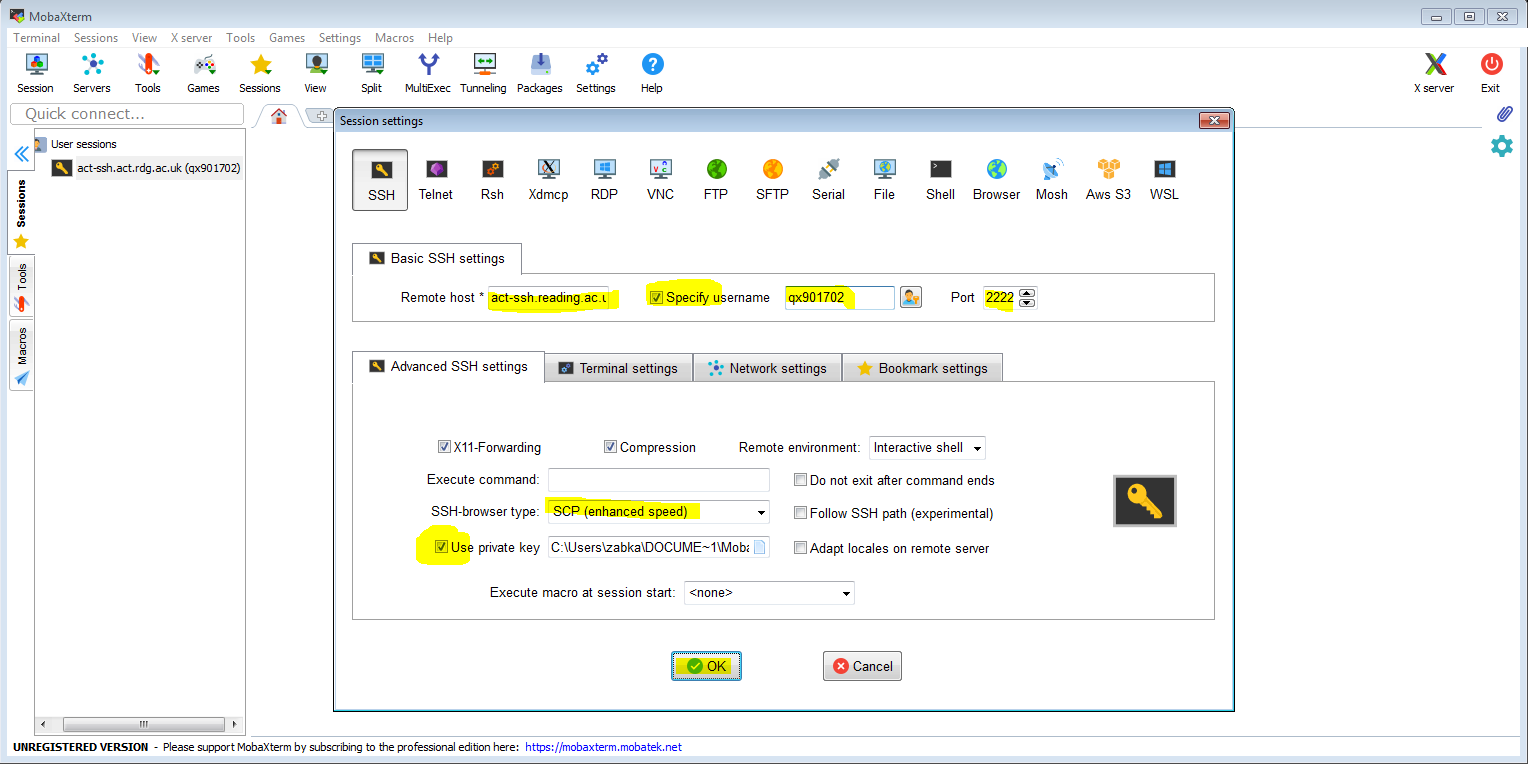
An alternative to calling ssh in the local terminal is to set up a session. To start let’s set up an ssh session connecting to act-ssh. In addition to entering the remote host and username, we need to remember to ensure that the connection is on port 2222 to enable ssh keys authentication. Also, in the ‘Advanced SSH settings’ tab, we need to make sure that ‘SSH-browser type’ is not set to ‘none’ and we tick ‘Use private key’ (it should automatically set it to the private key we have just generated).
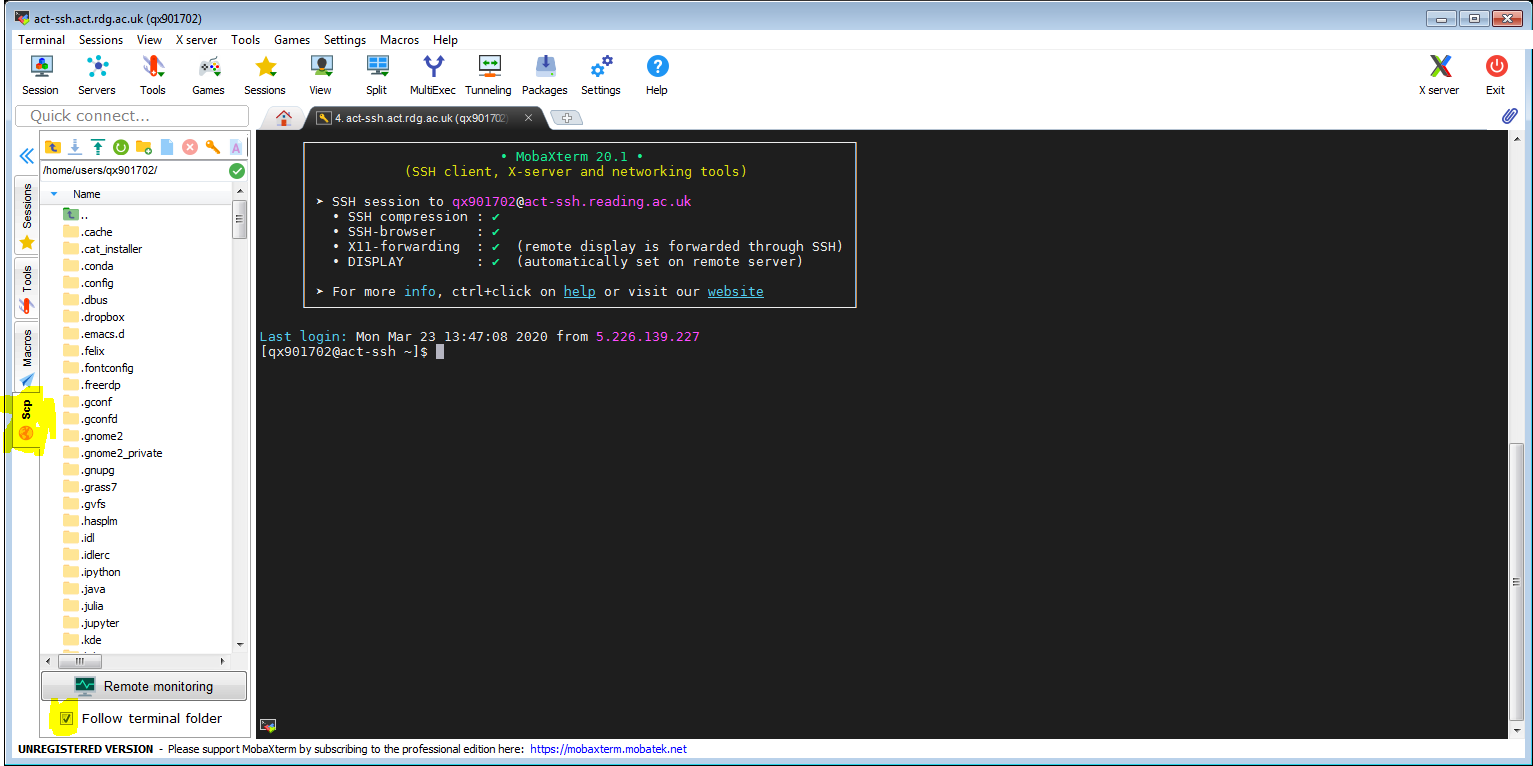
Now we can connect to act-ssh by clicking the connection icon (if the UoR password is already cached). Note the Scp tab on the left in the screenshot below. It will allow file transfer between the local and the remote system. You might want to tick ‘Follow terminal folder’.
Now, you can see the whole procedure in the video:
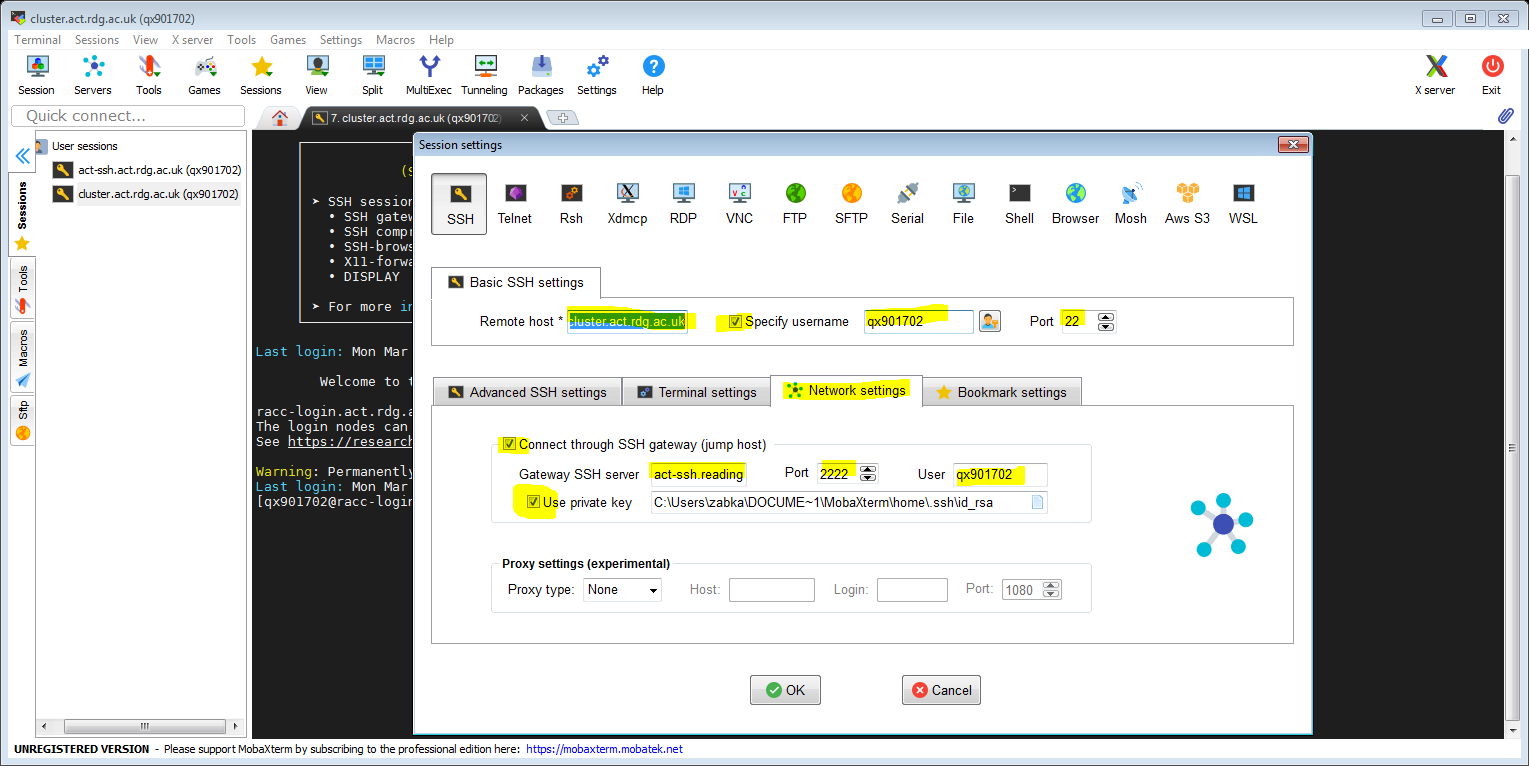
Now we will create a session that will connect to the cluster, transparently jumping via act-ssh. Like before, we right-click on ‘User sessions’ and we choose ‘Create new session’. In addition to the obvious settings from before (with the remote host being cluster.act.rdg.ac.uk in this case), we click the ‘Network settings’ tab and we tick and configure ‘Connect through SSH gateway…’ option. You can then set up act-ssh as the gateway server to the cluster as per instructions in the screenshot below. Again, it should be sufficient to tick ‘Use private key’ and the key will be found automatically.
Still not sure how to do it? See the whole set up process in the video:
In a similar way you can set up other connections to be made via act-ssh, e.g you can set up a connection to JASMIN.
Navigating the act-ssh directory tree to find your storage volume, especially when you need to find your user name from a long list can be tedious. Here we will set up a separate sftp session that takes you right to your chosen path. The first video is just an sftp session that connects you to act-ssh, and and you land in the default location, in your home directory.
This is a more useful example. We just copy the act-ssh sftp session (Unix home directory), but we change the ‘remote path’ to point to a location that is not convenient to navigate to manually, in this case it is your ndrive (yes this is your Windows ndrive).
In this case we will connect to rds-node1.act.rdg.ac.uk , and then we create a similar session that connect to my Windows office PC. Handy if you suddenly become VPN-less, or where the VPN doesn’t allow access to your desktop PC.
The method shown here might be easier to set up than creating ssh tunnels and connecting with the native Windows Remote Desktop client. To get a reasonable display quality you might want to tick ‘Enhanced graphics’
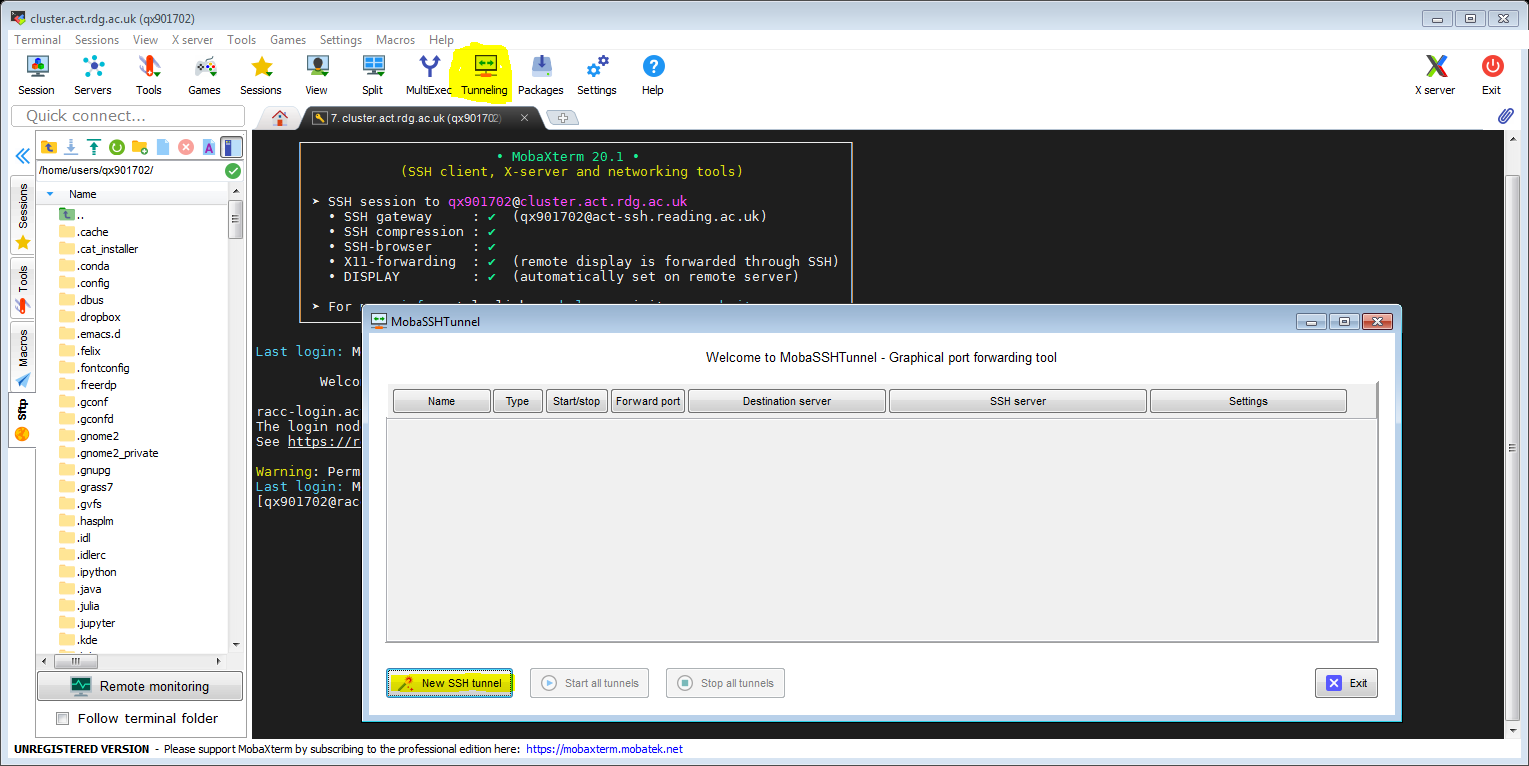
You can also use SOCKS proxy tunnel instead, as shown in the next section and in the video. To set up an ssh tunnel we click ‘Tunneling’ and ‘New SSH tunnel’.
To set up a tunnel that will allow to connect to NX using the full Nomachine client we specify the following settings:
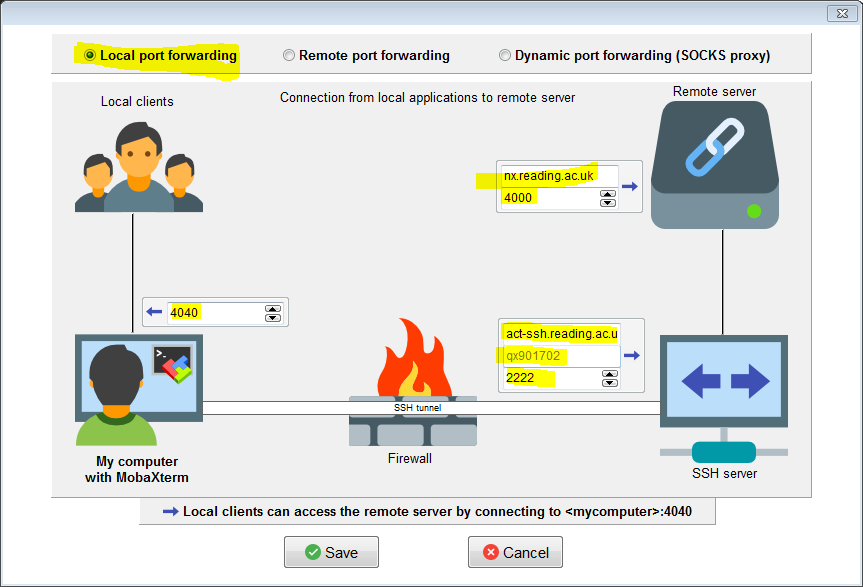
For instructions on how to set up the NX client to connect using the tunnel see Connecting to NX from Outside the University Campus.
Another useful option is setting the SOCKS proxy tunnel. Such a tunnel can be used with the Nomachine client (instead of the port forwarding tunnel above), with compatible web browsers (to access websites available only on campus) and with other applications that are able to connect via SOCKS proxy.
You can also use the SOCKS proxy with Firefox to access the web services available only on campus, but we do not have a video for this yet.
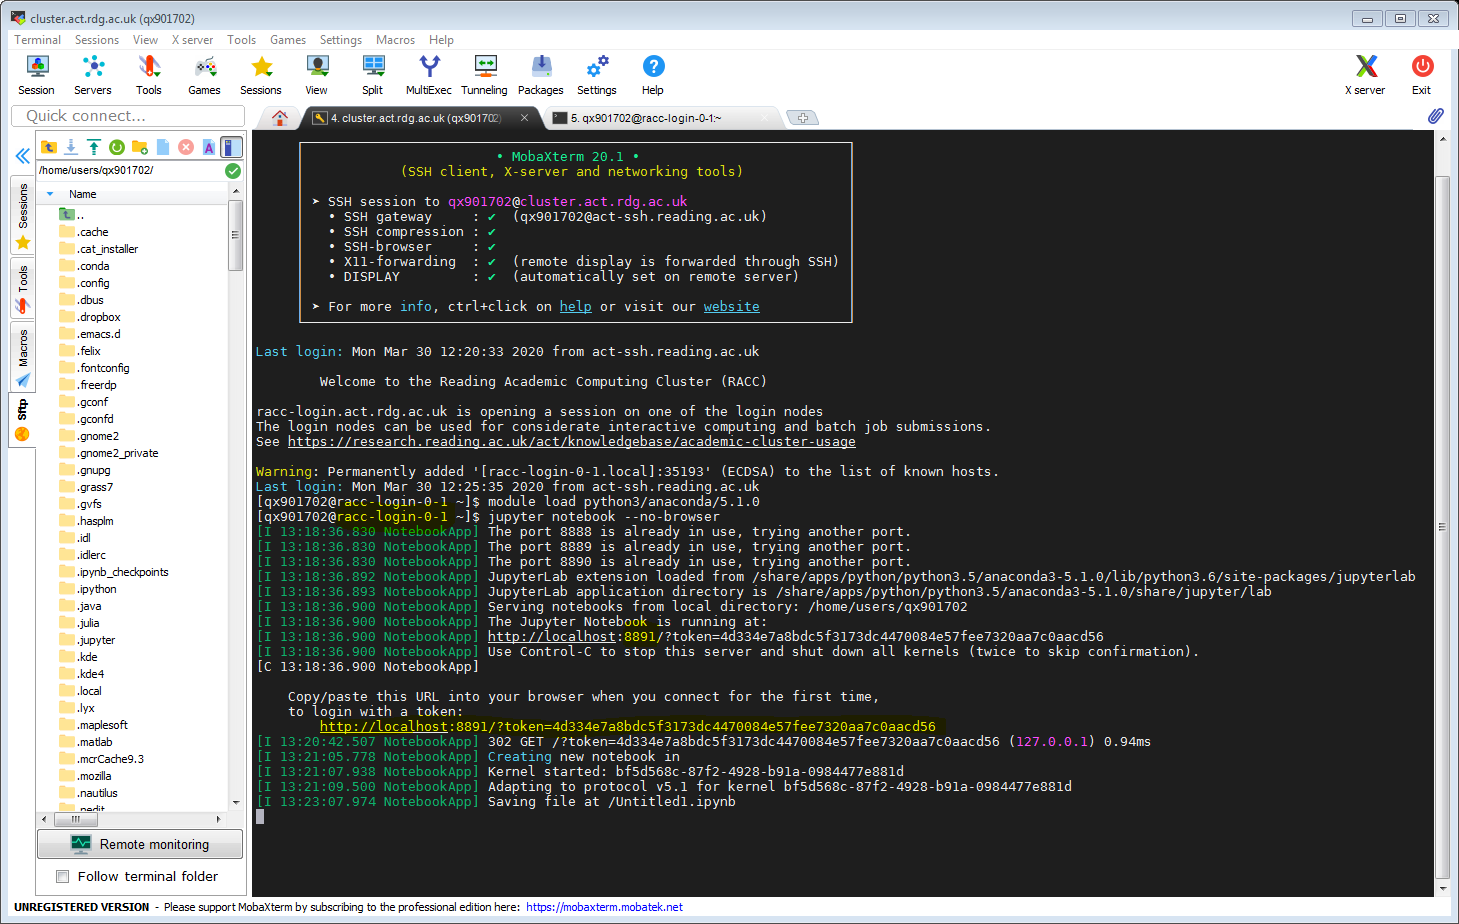
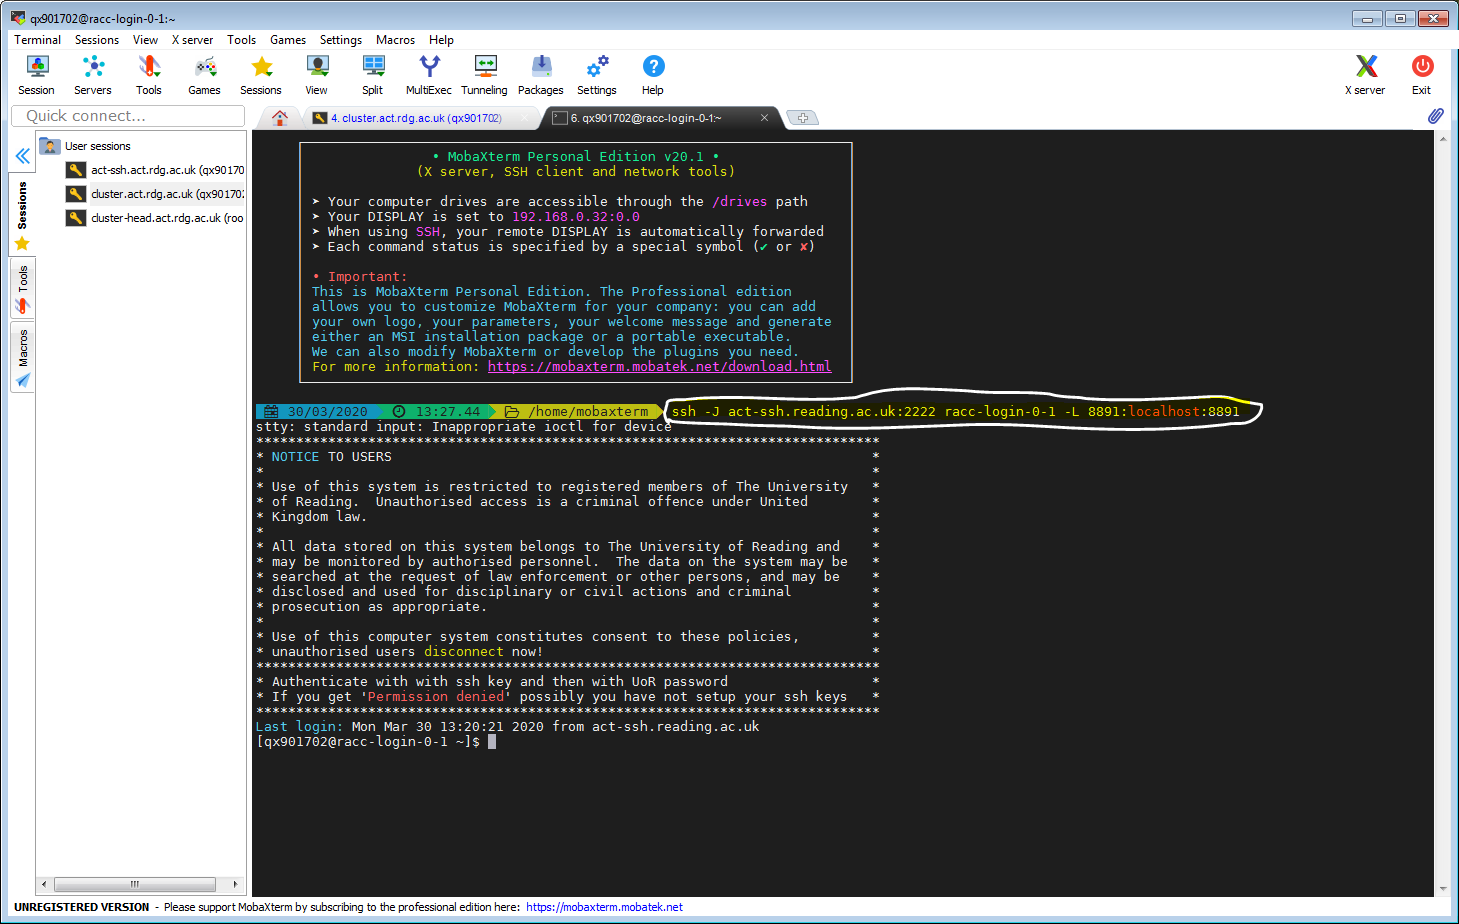
This is already described in the article Jupyter Notebook on RACC via ssh tunnel. Here we just show it in MobaXterm, using configured access to act-ssh on port 2222 and our already set up cluster connection. Let’s click our cluster session. When connected to one of the login node, let’s launch Jupyter Notebook. Note the hostname of the login node (in the form racc-login-0-X), and the port number for Jupyter Notebook connection.
In another tab we create the ssh tunnel. (You might need to specify your user name if you are connecting from a private device e.g. use -J qx901702@act-ssh.reading.ac.uk:2222)
Now we can paste the link obtained when launching Jupyther Notebook in the web browser on our local machine.