New: Academic Computing Drop-in Sessions
Academic computing drop-in sessions are now run by members of our team on Wednesday afternoons! Head to our drop-in info page for details & schedule....
 Reading Academic Computing Cluster – Batch Jobs
The strength of the Reading Academic Computing Cluster lies in its ability to run batch jobs. They should be used whenever possible and interactive jobs on the login nodes are only justified for work that truly needs user interaction, such as data visualization or code development and debugging.
Update: new partitions and new allocation policies!
Executing a program in batch mode means that a command or a sequence of commands is listed in a text file, which essentially is a set of instructions for the cluster how to run your job. This text file is called a batch script or a job script. Such a batch script is submitted to a batch scheduler for execution, rather than executing it directly in the shell. It is executed on the compute nodes when the requested computer resources become available, without any further user intervention. The opposite of a batch job is interactive computing, when you enter individual commands to run immediately.
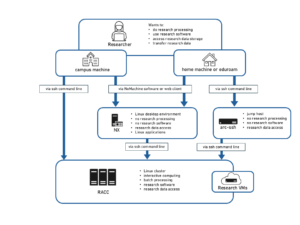
Typically, compute clusters consist of one or more login nodes which are used to prepare, submit and manage batch jobs and a large number of compute nodes. You can find more details about the RACC in our introduction. Batch computing involves users submitting jobs to a software called a batch scheduler, or resource manager, that decides the best and most efficient way to run the jobs while maintaining the highest possible usage of all resources. The scheduler keeps track of all computational resources available on the compute nodes, e.g. CPU cores and memory and of all the jobs submitted by the users. The jobs are then dispatched to suitable compute nodes as sufficient resources become available. Most clusters consist of multiple partitions, or job queues, which group different types of compute nodes and/or are set up with different access and usage policies.
The cluster resources are managed using the SLURM workload manger, see https://slurm.schedmd.com/ for more information. Users who are accustomed to the met-cluster and maths-cluster, which use the Grid Engine resource manager, will need to familiarise themselves with the new job submission procedures.
SLURM has some commands which will look familiar to Grid Engine users (e.g. on the former Maths and Met clusters), such as qsub, qdel, qstat and qalter. However, they are ‘wrapper’ scripts compatible with PBS (another batch scheduler), not Grid Engine.
A serial batch job is a job that runs on only one CPU.
A job script consists of two parts: the resource request, and one or more commands to run. In the batch script, the resource request instructions start with ‘#SBATCH’ and contain e.g. the specification of required CPU cores, running time, memory etc.
The RACC has sensible default values of resource request options which are suitable to submit a short serial job. Relying on those default values a job script can be as simple as:
#!/bin/bash

./myExecutable.exe
Note that the above is a regular shell script, which could be run interactively (and often it might be a good idea to run the script interactively at first, for testing). Let’s name our job script file script.sh, which we can submit to the scheduler with the command:
$ sbatch script.sh
Once the job is submitted, we can check its status in the queue with the command squeue -u <user name> (it is convenient to specify your user name to see your jobs only, squeue alone will show you everyone’s jobs):
$ squeue -u qx901702
JOBID NAME USER PARTITION STATE NODELIST(REASON) TIME TIME_LIMIT CPUS MIN_MEMO
1229352 script.s qx901702 short PENDING  (Resources)                 0:00 1-00:00:00 1 1G
At first the job might be in ‘PENDING’ state, which means that it is waiting in the queue to be executed. Later on, once the job is running successfully, we will see the the following output:
$ squeue -u qx901702
JOBID NAME USER PARTITION STATE NODELIST(REASON) TIME TIME_LIMIT CPUS MIN_MEMO
1229352 script.s qx901702 short RUNNING compute-5-0 0:52 1-00:00:00 2 1G
If we realize that a running job is no longer needed, we can terminate it with the command scancel followed by the JobID, which is the number that identifies the job and can be inferred from the squeue command (see above):
$ scancel 1229352
Note that by default a job receives the name of the job script. If the job writes to standard output, or to standard error, the default behavior is that both are redirected to the file named slurm-<job ID>.out and placed in the current directory. In our above example it would be slurm-1229352.out. Furthermore, we can see above that the default memory allocation is 1G (i.e. 1 GB) and the default time limit is 1-00:00:00 (i.e. 1 day). The job runs in the default partition ‘short’, where the default time limit of 24h is also the maximum allowed time limit. If we need more than that, we can customize our resource request as shown in the next section.
In most cases, we want to customize our batch script to ask for the resources that are needed for the job. Consider the following example script:
#!/bin/bash

#these are all the default values anyway
#SBATCH --ntasks=1
#SBATCH --cpus-per-task=1
#SBATCH --threads-per-core=1

# the job name and output file
#SBATCH --job-name=example_batch_job #(default is the script name)
#SBATCH --output=myout.txt #(default is ~/slurm-<job ID>.out)

# time limit and memory allocation
#SBATCH --time=2-0:00:00 #(2 days and 0 hours, default is 24 hours)
#SBATCH --mem=2G #(2 GB, default is 1G)

# 'short' is the default partition, with max time of 24h
# longer jobs are submitted to the partition 'long'
#SBATCH --partition=long

./myExecutable.exe
The above is a single process (–ntasks=1, –cpus-per-task=1) batch job. The significance of ntasks, cpus-per-task and treads-per-core will be discussed in more detail in the sections focusing on parallel batch jobs. Here we will explain them only briefly and you can safely skip the next paragraph if you find it too technical.
‘ntasks’ defines the number of processes that Slurm will automatically start for us. We will set it to value greater than 1 only in case of parallel MPI (distributed memory) jobs. ‘cpus-per-task’ defines the number of CPU cores allocated for the job. We will use it to allow access to multiple CPU cores in parallel jobs that are not ‘standard’ MPI jobs (which could be started with mpirun). This includes OpenMP (shared memory) multi-threaded jobs, or any other cases where the job spawns processes or threads on its own, e.g. when using parallel library functions or parallelization constructs in applications or languages like Matlab, Python, and R. Finally, we will always set ‘–threads-per-core=1’. In most cases, this is the default, but to avoid confusion it is good to always add this in the job script. The reason for adding this line is related to Simultaneous multithreading (SMT), called also hyper-threading in case of Intel processors. Hyper-threading provides two hardware threads (logical CPUs, don’t confuse these with execution threads, in multithreaded programs) per physical CPU core. In the case of CPU intensive numerical modelling jobs typically it is more efficient to not run more processes or threads than the number of physical cores. In Slurm, a logical CPU is defined as a hardware thread. This might be confusing, because we will ask for one CPU with intention to use 1 CPU core and when the job starts be counted as using two CPUs in Slurm, because it is consuming two hardware threads associated with one CPU core. Now, coming back to the ‘cpus-per-task’ allocation request, with ‘threads-per-core=1’ it is guaranteed that the job will have exclusive access to N CPU cores, and to 2N hardware threads. It is also enforced that the job will not exceed this allocation – regardless how many processes or threads will be created, and regardless how many CPU cores the node has, those processes and threads will share only the allowed number of cores and hardware threads. (Experienced users might want to decide if they want to allocate a physical core or a hardware thread for each of their processes or threads, but for numerical modelling jobs one physical core per process or thread is usually more efficient. The other hardware thread can still be used for some non-blocking library calls. e,g, we have found that in MPI jobs, there is a substantial performance gain when the second hardware thread is available for non-blocking MPI calls.
It is useful to specify a custom name for the job and for the output file, which both standard output and standard error are redirected to. Here they are ‘example_batch_job’ and ‘myout.txt’, respectively.
Now we move on to the trickier part, the job’s running time and memory allocation request. You might not know in advance how long the job will run and how much memory it will need. You will have to estimate this by trial and error and you should aim to be quite accurate in the finish. If you overestimate the requirements, this will be a waste of resources and it might increase the job’s queuing time, especially in the case of over-allocating memory. On the other hand, if you underestimate how much time or memory your job needs, your job will be killed when it exceeds the time limit or when it exceeds the memory allocation. In this example we set the time limit to 2 days and the memory allocation to 2 GB.
The default partition (job queue) is ‘short’. If you need longer running time , you can submit your job in the partition ‘long’ and in the project partitions available to paid projects. There are also GPU partitions. The default account is ‘shared’. You do not need to change this. In the past an account needed to be specified for access to paid-for project allocation, but now specifying project partition is sufficient, and access is controlled using security groups. The following section provides more information about partitions, resource limits and resource allocation policies.
Email notifications are disabled by default, they can be enabled with the following directives:
#SBATCH --mail-type=ALL
#SBATCH --mail-user=<your email address>
An example batch script for serial jobs can be found here:
/share/slurm_examples/serial
You might find it confusing that ‘squeue’ will often show that your serial job uses not 1 but 2 CPUs. This is because of hyper-threading. Recall the option ‘–threads-per-core=1’. Modern processors have a certain number of physical cores, and might have a larger number of virtual CPUs. Typically one physical core is shared by two virtual CPUs (hardware threads). Slurm counts logical CPUs, not physical cores. However, in most cases of numerical modelling jobs, it doesn’t make much sense for two computing threads to share the same physical core. Therefore a whole physical core, which has two virtual CPUs, is allocated to the job.
A batch job is submitted to one or more partitions (job queues). Different partitions are associated with different access policies, resource allocation allocation policies, resource limits, and might be providing access to different nodes. Selecting the right partition will allow efficient use of resources, and will shorten job’s queuing time and running time. Those are the partitions currently in use:
On the free (older) nodes:
For experienced users and for large resource requirements:
On the GPU nodes:
For paying customers:
Job arrays allow to easily manage large collections of similar jobs, e.g. to run the same program on a collection of input files, on a range of input parameters, or to run a number of independent stochastic simulations for statistical averaging. We strongly recommend using job arrays whenever possible, because it reduces the load on the scheduler.
Submitting a job array is as simple as adding ‘–array=<index range>’ to the job submission parameters. We can specify the task IDs as a range of consecutive integers: ‘–array=1-10’, a list: ‘–array=1,3,5’, or with an increment ‘–array=1-10:2’.
In the following example we submit a job consisting of 100 array tasks:
#!/bin/bash

#SBATCH --ntasks=1
#SBATCH --array=1-1000
#SBATCH --job-name=example_job_array
#SBATCH --output=arrayJob_%A_%a.out
#SBATCH --time=120:00      #(120 minutes)
#SBATCH --mem=512  #(512 MB)
#SBATCH --partition=scavenger #jobs might be killed and re-queued, only this partition allows submit and run so many array tasks
echo “This array task index is $SLURM_ARRAY_TASK_ID”

./myExecutable.exe input_file_no_${SLURM_ARRAY_TASK_ID}.in
The job tasks are distinguished by their ID provided in the environment variable SLURM_ARRAY_TASK_ID. ‘%A’ and ‘%a’ evaluate to the job ID and task ID and can be used to construct output file names. The above job takes a number of input files, one for each individual array task.
In the above example, we submitted the array job tin the partition ‘scavenger’. We need to be prepared that some array tasks might be killed and re-queued. The advantage is that we can submit large array jobs, and we have access to many CPU cores.
Some array job examples can be found in:
/share/slurm_examples/
A parallel batch job is a job that runs on multiple CPUs.
In the SGE resource manager on the met-cluster and the maths-cluster, a job was simply requested with a number of CPU slots allocated to it. On those clusters it was up to the user to spawn required processes and it was the user’s responsibility to not oversubscribe their allocation. SLURM offers more help and flexibility in starting parallel jobs. It will also forcibly limit the resources available to the job, to those specified in the job script.
In SLURM, a job can consist of multiple job slices. A job slice is a command or a script. In the simplest case, the execution of the commands in the job script itself is the only job slice. An example is the serial batch job script above. Other job slices within a batch script can be started using the srun command. Job slices can run either in parallel or sequentially within the job allocation.
A task can be interpreted as an instance of a job slice. SLURM can start a number of identical tasks in parallel for each job slice, as specified with the flag ‘—ntasks’ for that job slice i.e. for the job script as a whole, or for the srun call.
An example of a multi task job is an MPI job. We just specify the number of tasks we want with ‘—ntasks’ and SLURM will start parallel MPI processes for us. Those tasks might use more than one CPU per task if they are multi-threaded.
To have more job slices we use more calls to the srun command in the job script. For example, we can have a job consisting of a data producing slice, possibly with many parallel tasks, running in parallel with a data collector slice, again with many tasks, and many CPUs per task if needed.
A task can have more than one CPU cores allocated, such that the user application can spawn more processes and threads on its own. For example, if we run an openMP multi-threaded job, or an application like R or Matlab, which might be starting more processes or threads on its own, we just request one task to start the application, but with the suitable number of CPUs for this single task.
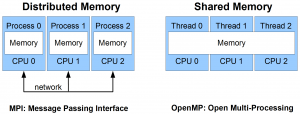
OpenMP (Open Multiprocessing) is a programming platform that allows one to parallelise code over a homogeneous shared memory system (e.g., a multi-core processor). For instance, one could parallelise a set of operations over a multi-core processor where the cores share memory between each other.
MPI (Message Passing Interface ) is a programming platform with the ability to parallelise code over a (non-)homogenous distributed system (e.g., a supercomputer). For instance, it’s possible to parallelise an entire program over a network of computers, or nodes, which communicate over the same network but have their own memory layout.
Shared memory allows multiple processing elements to share the same location in memory (that is to see each others reads and writes) without any other special directives, while distributed memory requires explicit commands to transfer data from one processing element to another.
The schematic below illustrates the principles of distributed memory and shared memory parallel computing.
This is an example of a 16-way OpenMP job.
#!/bin/bash

#SBATCH --ntasks=1
#SBATCH --cpus-per-task=16
#SBATCH --threads-per-core=1
#SBATCH --job-name=test_smp
#SBATCH --output=myout.txt
#SBATCH --time=120:00
#SBATCH --mem-per-cpu=512

export OMP_NUM_THREADS=16
./a.out
In the above script, one task is requested with 16 CPU cores to be allocated for this task. The executable can use up to 16 CPU cores for its threads or processes. In a similar fashion, parallel Matlab jobs (not tested) can be launched (with the Matlab parallel toolbox, but without the Matlab parallel server), or any other applications which are using multiple CPUs and managing them on their own.
Using ‘–cpus-per-task’ is a bit tricky because of hyperthreading. For Slurm the CPU is a logical CPU (hardware thread). In RACC Slurm is configured to always allocate a whole physical core to a task. But in the directive ‘–cpus-per-task’, we are counting Slurm’s CPUs. In the case of processors with hyperthreading, these are logical CPUs (hardware threads). Most physical nodes on the RACC have hyperthreading functionality which means there are two logical CPUs per physical core. On the VM nodes the CPUs are hardware threads allocated by the hypervisor. If you are happy to count CPU as hardware threads that’s easy and consistent, in both cases. However, often it is better to run just one thread per physical core and then some customization of the job, depending on the compute node capability, is needed.
This is an example of a 16-way MPI job.
#!/bin/bash

#SBATCH --ntasks=16
#SBATCH --cpus-per-task=1
#SBATCH --nodes=1-1
#SBATCH --job-name=test_mpi
#SBATCH --output=myout.txt
#SBATCH --time=120:00
#SBATCH --mem-per-cpu=512

module load MPI/mpich/gcc/3.2.1
srun cd 2>/dev/null #a workaround, needed when node powers up
srun myMPIexecutable.exe
The above script requests 16 tasks for 16 MPI processes. Typically it is better to have all the processes running on the same node, which is requested with ‘–nodes=1-1’. In SLURM, the number of tasks represents the number of instances the command is run, typically done by a single srun command. In the above script, we have 16 identical processes, hence this is a slice with 16 tasks and not just one task using 16 CPU cores.
The mpich mpi library version loaded by the module command is built with SLURM support. The srun command will take care of creating and managing MPI processes, it replaces the mpirun or mpiexec commands.
An example of an MPI program and job script can be found here:
/share/slurm_examples/mpi
Similar to the case of serial jobs, an MPI process (task) gets access to a whole physical core, when possible, and then it is counted as two CPUs in Slurm.