Knowledge Base
- /
- /
- /
 Paid-for resources on RACC.
Access to project partitions
Each group has a separate partition, however all those partition share the same pool of all purchased standard compute nodes (the exception are projects with custom hardware). Each project partition has specific resource limits, proportional to the capacity of the hardware purchased by the project. Access to each project partition is controlled via a security group with the name in the format racc-<project name>, and project managers have access to add/remove members in this group.
To submit a job to the project partition, you just need specify the partition. This can be done from the command line:
sbatch -p <project name> batch_script.sh
or in the batch script with the directives:
#SBATCH --partition=<project name>
E.g. if the project name is mpecdt we submit with the command:
sbatch -p mpecdt batch_script.sh
or in the script we add
#SBATCH --partition=mpecdt
Viewing the resurce limits
The resource limits associated with the project can be checked with the command:
sacctmgr show qos <project name> format=Name,MaxTRESPU%20,grpTRES%20
e.g.:
$ sacctmgr show qos mpecdt format=Name,MaxTRESPU%20,grpTRES%20
Name        MaxTRESPU           GrpTRES
---------- -------------------- --------------------
mpecdt                          cpu=384,mem=2T
Note that the CPU number shown is for virtual CPUs. It is double because of Simultaneous multithreading (SMT). The number of physical cores is half of the number shown.
Managing access:
Project managers can can add and remove users allowed to use project resources by adding and removing users from the relevant Active Directory group. The group names are in the format racc-<project name> (if needed we can just add a nested group to racc-<project name>). Group membership can be managed using Group Manager software available from Apps Anywhere (works on campus) and in a web browser using https://rds.act.reading.ac.uk (see Accessing Windows Servers and Desktops from off campus). In Group Manager, the manager will see only the groups they have the permissions to manage.
Activating the changes in group membership requires reloading Slurm configuration. This will happen periodically, and also when a new user logs in to RACC, so in some cases there might be a deley before the change is active.
Efficiency and performance improvements
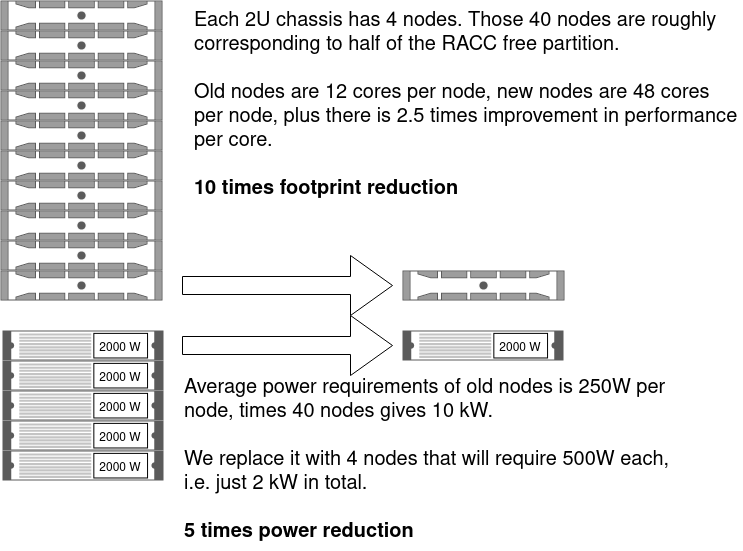
We have compared performance and power efficiency of the new nodes with the old nodes. As an example old node we we took 10 years old Xeon X5650 because we have quite a few of them, and we would like to retire them as soon as the new nodes are purchased. Comparing performance per core of the fully utilised CPUs, for typical jobs ruining on RACC, the new processors have consistently over 2.5 better performance (we looked at one Meteorology model – improvement factor is 2.6, and at ‘Physics’ section of the Passmark test suite – improvement factor is 2.78). Power consumption of the old 12-core servers is over 250 W per node. Power consumption of the new 48-core nodes is slightly over 500 W per node. Summarising this: we get over 2.5 times faster cores, there is 10 times racks space saving (running server rooms is expensive), and power saving is 5 times (it is money saving for the university, but also reduction of the environmental impact). This can be illustrated in the following diagram:
Custom project partitions
In case of large computational projects, with the amount of hardware that could form a separate cluster, or with specialized hardware e.g. with GPUs, separate project partitions can be created. In such cases confirmation from the DTS must be obtained before any hardware is purchased.
Legacy met-cluster paid-for projects
The active meteorology paid-for projects should use the dedicated resources for interactive and batch computing on the RACC. The sizes of the CPU allocations on RACC are the same as they were on met-cluster (however, in some cases we are counting hardware threads, not CPU cores now, and the numbers will be double). The existing ‘project’ compute nodes are out-of-warranty and this project partition will be gradually reduced in size and then decommissioned as the legacy subscriptions expire.
Access to the legacy paid-for accounts and partitions – the commands for users and account managers
To submit a job to the privileged ‘project’ partition, one needs to specify the account name i.e. their project name and select the partition ‘project’. This can be done from the command line:
sbatch -A <project name> -p project batch_script.sh
or, by specifying the account and the partition in the batch script with the directives:
#SBATCH --account=<project name>
#SBATCH --partition=project
In case of a custom project partition you need to replace partition ‘project’ with the name of your custom project partition (which is the same as the account name). Note that specifying the account with -A <project name> and not adding -p project will result in running the job in the free partition ‘cluster’ (in some cases it might be useful). Such job will enjoy higher priority given by the ‘project’ quality of service (QOS) associated with the account, and it will count towards the account’s CPU limit.
The accounts (projects) available to the user can be listed with the command:
sacctmgr show assoc user=<username> format=User,Account,QOS
The project allocation and the list of allowed users can be checked with the command:
sacctmgr show assoc Account=<project> format=Account,User,GrpTRES
It might happen that a job does not start in the paid-for allocation because some resources are already in use, or because the job is larger than the account’s CPU allocation. In those cases the job status will be ‘AssocGrpCpuLimit’. For pending (queued) jobs, the project account can be changed. If you have access to another account you can try:
scontrol update job <job number> Account=<another project>
Or, you can reset the job to the default free account ‘shared’ and the partition ‘cluster’:
scontrol update job <job number> Account=shared Partition=cluster QOS=normal

