New: Academic Computing Drop-in Sessions
Academic computing drop-in sessions are now run by members of our team on Wednesday afternoons! Head to our drop-in info page for details & schedule....
 arc-ssh with MobaXterm – step by step guide
This article is a detailed tutorial on how to connect to arc-ssh with MobaXterm from Windows. Please first have a look at the general information about arc-ssh here: Externally visible ssh server – arc-ssh.
For other instructions related to remote access to our services, browse our Working From Home section.
Linux and Mac users: see also the twin article arc-ssh for Linux and Mac users – step by step guide.
We recommend that users who want to connect to the RACC follow the instruction up to point 3. The remaining points are optional, depending on if you need them, and you don’t need to do them in order. In the screenshots below, the username qx901702 is used, please replace it with your own username for your connection.
Let’s download and install the most recent version of MobaXterm. We recommend that you use the installer version, not the portable version to install all free MobaXterm functionality on your machine. Older versions might have problems with using ssh keys, please make sure you update your MobaXterm to the latest version.
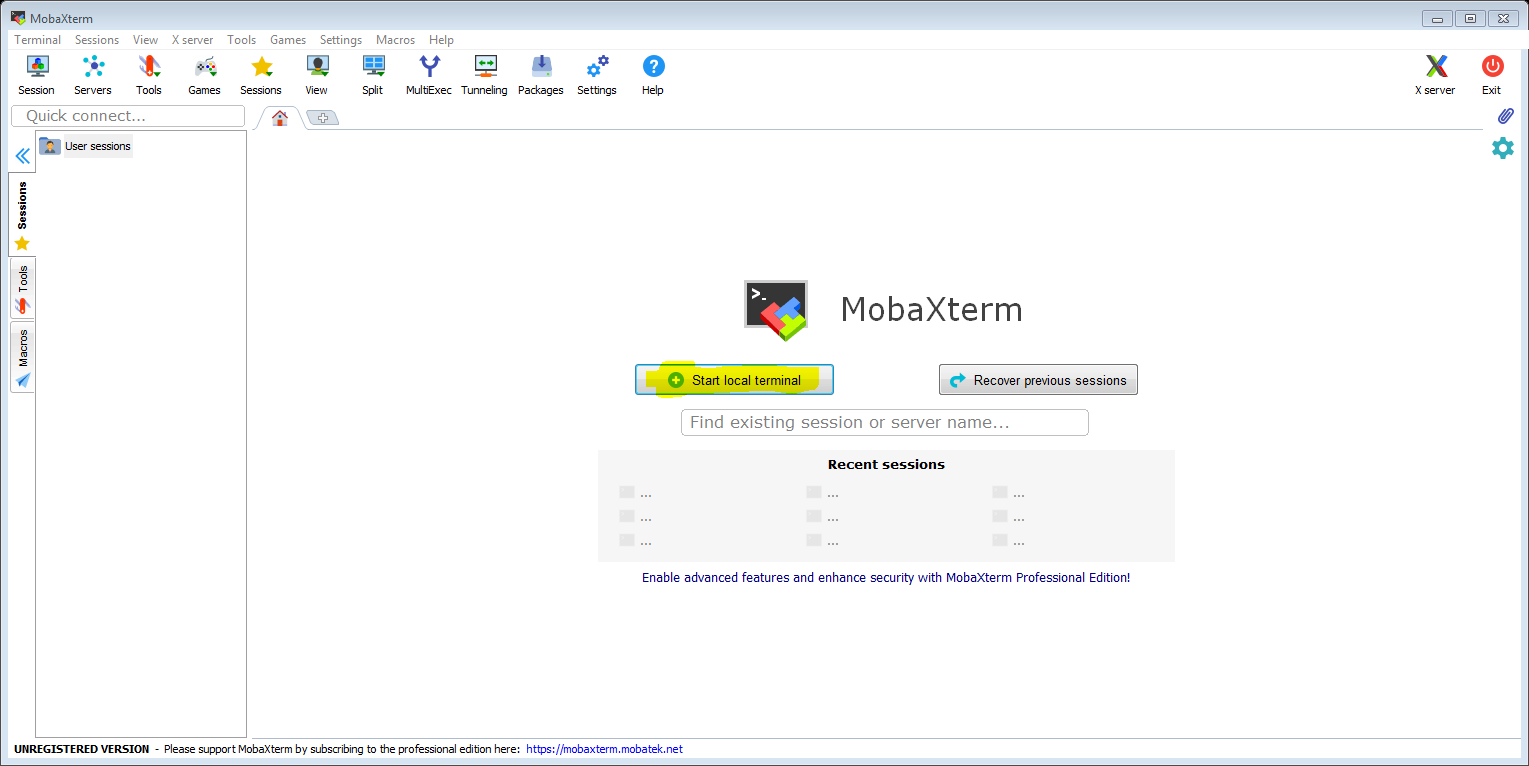
Launch MobaXterm and click on ‘Start local terminal’. The local terminal provides a Unix shell environment on your Windows PC and it includes ssh.
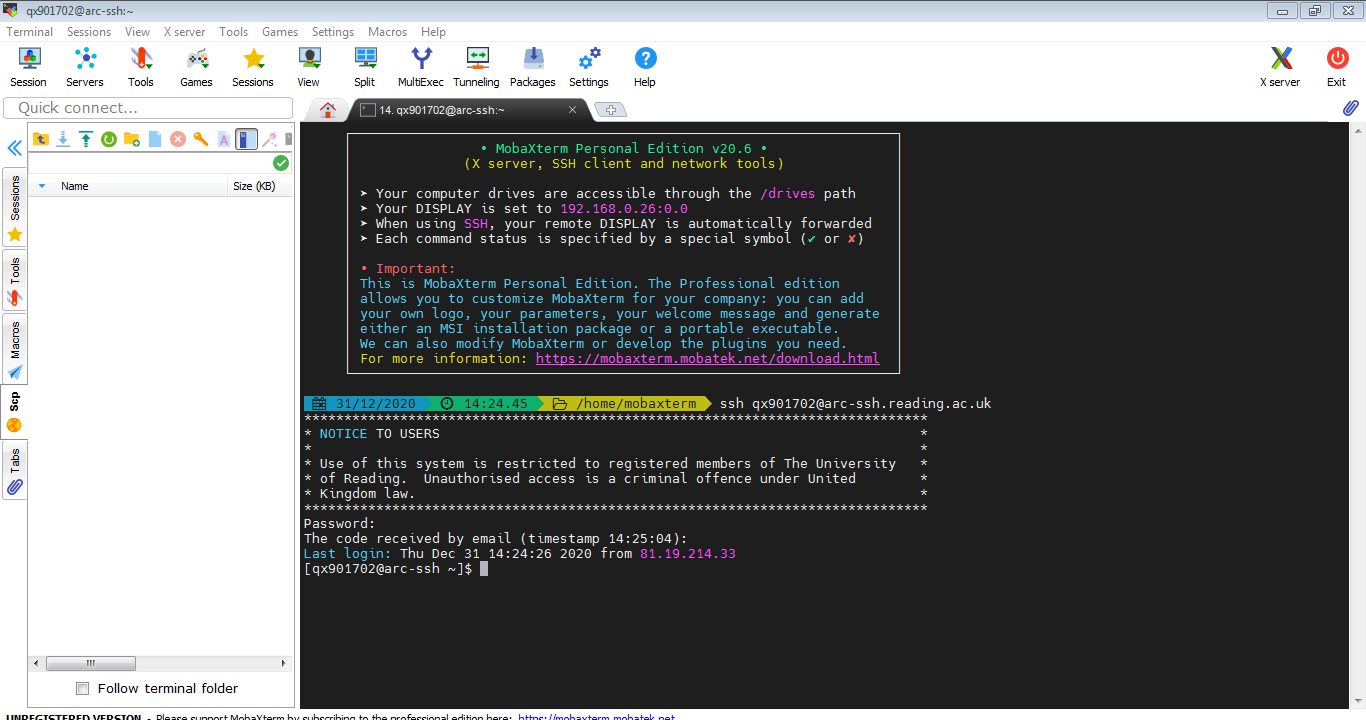
Connect to arc-ssh, authenticate first with your UoR password and then with the code you receive to your UoR email box (or use Google Authenticator verification code if you already have set it up). Please note: If you are not registered to use arc-ssh, you will see a message related to this after entering your UoR password and your login will fail. More information about registering for arc-ssh can be found here.
When you have entered your password and code, you might get a pop up window asking you to enter the password and then a new one-time password again for sftp file transfer connection. This is for the sftp/scp tab in the left panel in your MobaXterm window. For now we just select cancel or close the pop up window. It is not very practical to login twice, and using sftp functionality will be easier, i.e. will not require separate authentication, when we set up ssh keys in the next section.
If the password and one time code were entered successfully, you should be logged in to arc-ssh and see a screen similar to the one below:
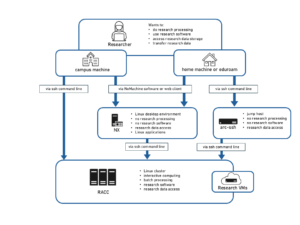
Note that arc-ssh is just a jump host that should only be used as a gateway to cross the firewall and connect to other systems on campus (e.g. RACC), and for file transfers. Please do not use arc-ssh for any other purposes.
Using ssh keys will replace authentication with the one-time code, but you will still need to enter your password. If you decide to allow MobaXterm to cache your password, login will be fully automatic. Please use this with caution. You can set up ssh keys and allow MobaXterm to cache your password on a machine that is used only by you.
To set it up we just need to type two commands in the local terminal – one to generate the ssh keys on your home machine (if you do not have them yet) and the second command to transfer the public key to arc-ssh, which puts them into your UoR Unix home directory. Once the public key is installed there, the ssh key authentication will be used as the second authentication method instead of one-time password. Connecting with MobaXterm can then be made fully automatic. The part of setting up your ssh keys is not specific to MobaXterm, the same commands can be used on Mac and on Linux. Here we just show it in MobaXterm, with screen shots.
With the command ‘ssh-keygen’ we create two files on your local machine containing your private and public ssh keys: id_rsa and id_rsa.pub. At the prompt ‘Enter file in which to save the key’, we leave it blank, i.e. we agree to the default file name and location: id_rsa. The private key stays only on your local machine and you need to protect it from being discovered by third parties as it is like a password. The public key can be shared and you place it on the remote system. It will be used to confirm your identity when you connect to the remote system, in our case arc-ssh.
The command ssh-copy-id will take your public ssh key, connect to the destination machine, here act-ssh.reading.ac.uk, and it will append the public key to the ~/.ssh/authorized_keys file. All of this will happen automatically and the command will take care of setting up the right permissions on the relevant files and directories. The screenshot below shows both commands for user qx901702:

To recap: The commands that the user ab123456 would need to type into the MobaXterm shell would be:
ssh-keygen
ssh-copy-id ab123456@arc-ssh.reading.ac.uk
This video shows the ssh key generation process:
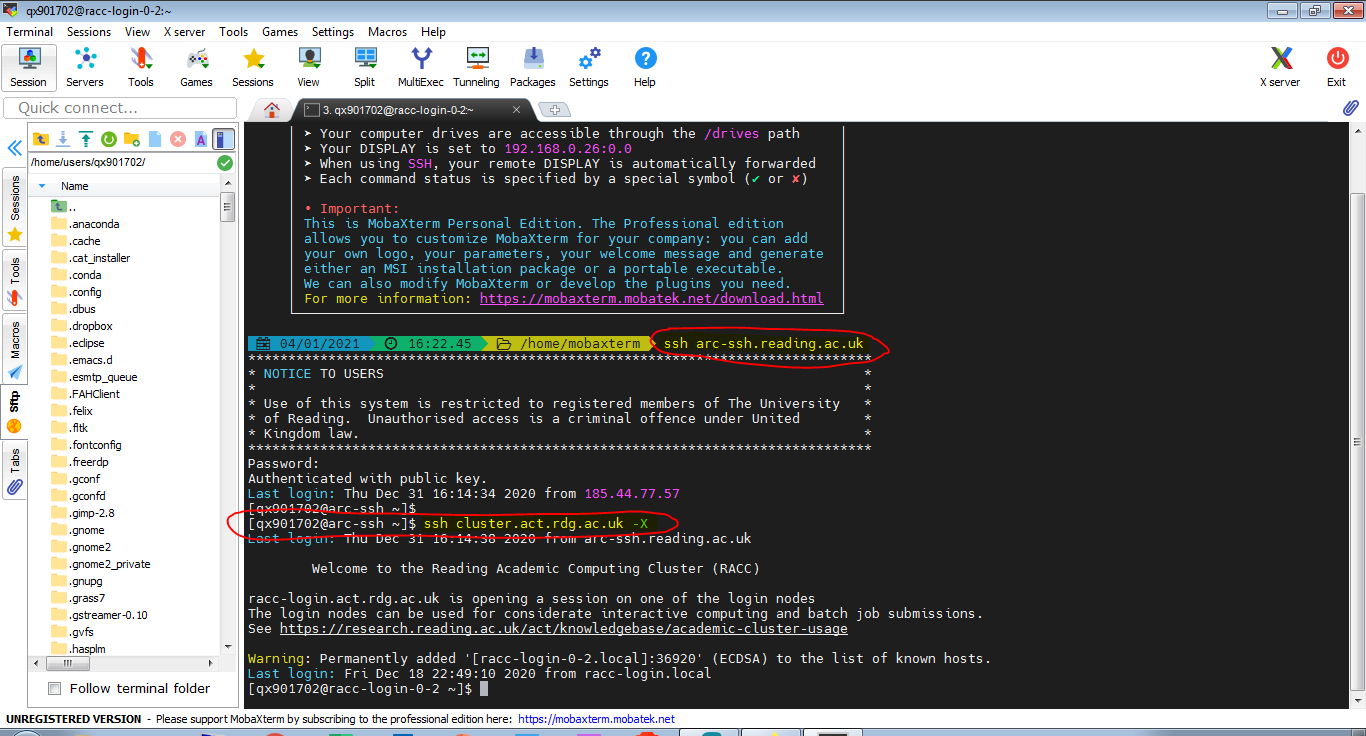
Once you have the public key copied to the UoR systems, you will just need to type the password and you will be logged in without the need to enter a one-time code. If you allow MobaXterm to cache your password, subsequent logins will not require typing any passwords at all. From act-ssh you can further connect to other UoR systems, e.g. to cluster.act.rdg.ac.uk (RACC).
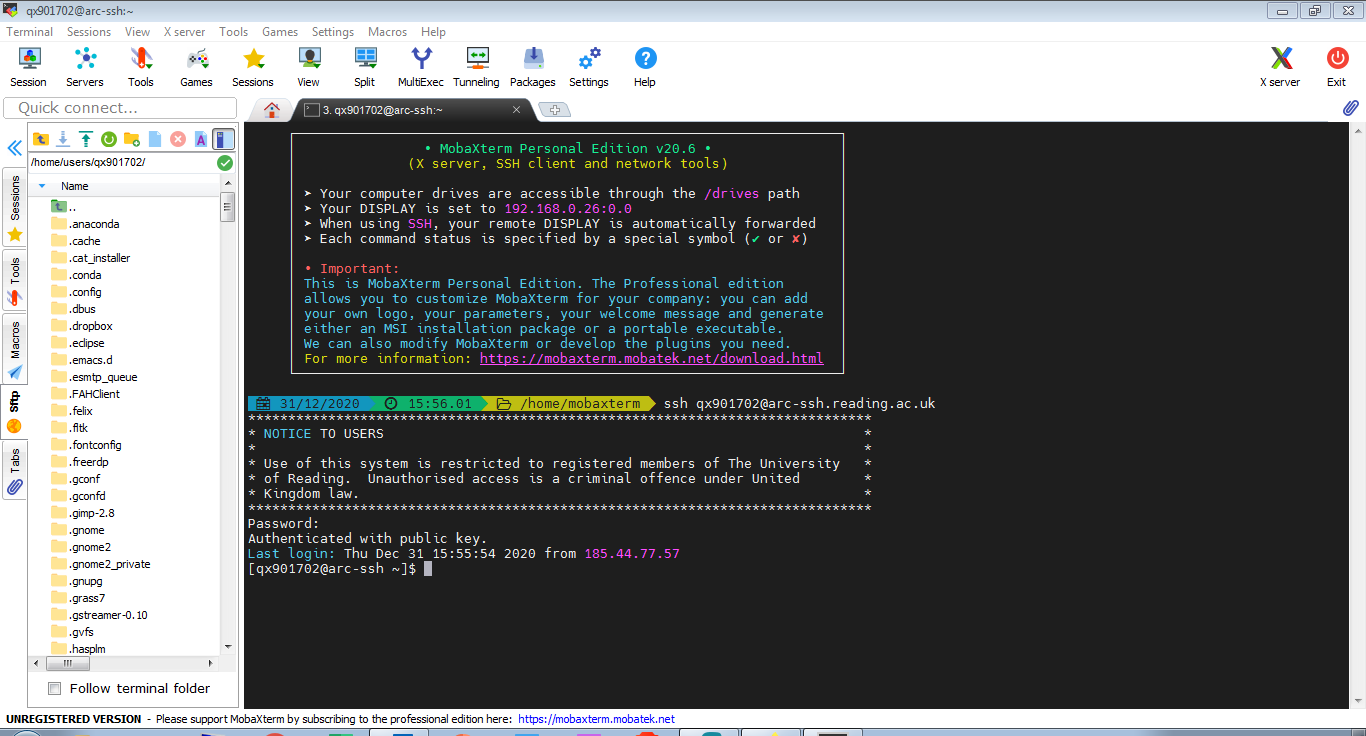
The screenshot above shows a MobaXterm terminal that is connected to arc-ssh. In the left hand side panel you can find the sftp window, which allows you to transter files between your local machine and the storage volumes on the Unix system. Sftp requires a separate login. Here it happens automatically – the password is temporarily cached by MobaXterm and ssh key is used for .
On arc-ssh you can access all your data volumes. This includes your Unix home directory and research data storage mounted under /storage and SMB (Windows) shares as well. The SMB shares are mounted on /dfs/<user name>.
The video below shows how navigate Unix storage in the sftp side panel:
From act-ssh you can also connect to other systems, e.g. you can connect to the RACC, as shown in the screenshot below. Note that the sftp browser panel will continue to show the files on arc-ssh not on the server you are connecting to from arc-ssh. It doesn’t matter in the case of RACC, where the files are the same and in the same locations as on arc-ssh, but it might make a difference if you connect to other systems. If you need an sftp browser to show the files from the second server you connect to, you can achieve this by setting up a session which uses arc-ssh as a jump host. This will be shown in Section 3 of this tutorial.
The ssh setting are important for some some of the procedures presented in this tutorial. To edit the SSH configuration options, in the top menu click Settings->Configuration and select the SSH tab.

Please make sure you select the options as show in the screenshot above and as described below. The options that are needed in order for the instructions provided in this tutorial to work are listed in bold font.
SSH-browser settings – this is related to the sftp panel which you can use to copy files between your local machine and the UoR server.
SSH settings
SSH agents
An alternative to calling the ssh command in the local terminal is to set up a session to store connection details and to automate the login process. MobaXterm provides a number of different session types, the ssh session is just one of them. To start let’s set up an ssh session connecting to arc-ssh. Later on we will also create a session that automatically connects you to RACC using arc-ssh as a jump host.
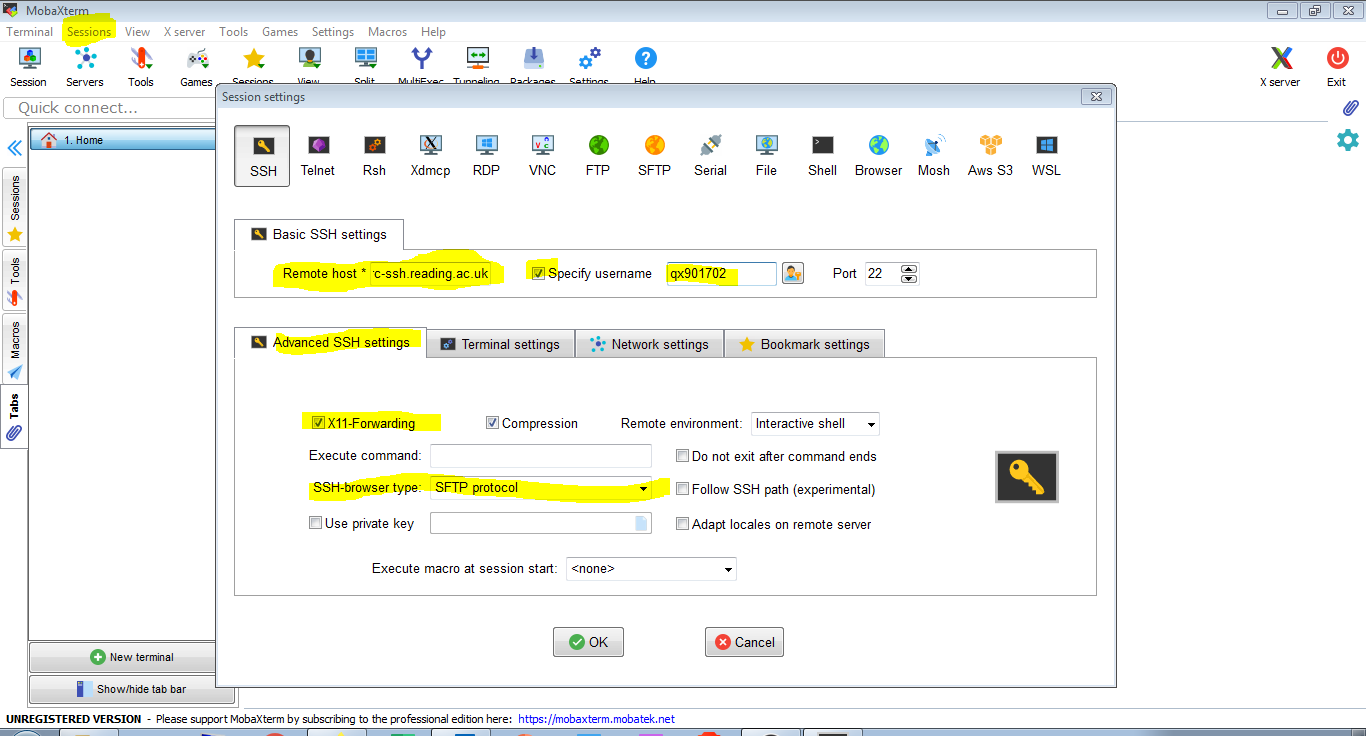
Click on ‘Sessions’ in the top menu and choose ‘New session’. Select the ‘SSH’ option and enter the connection details as shown in the screenshot below. Also, in the ‘Advanced SSH settings’ tab, make sure that ‘SSH-browser type’ is not set to ‘none’ and tick ‘Use private key’ (it should automatically set it to the private key we have generated in Section 2). Also, ensure that X11-Forwarding is enabled. Confirm your settings with ‘OK’.
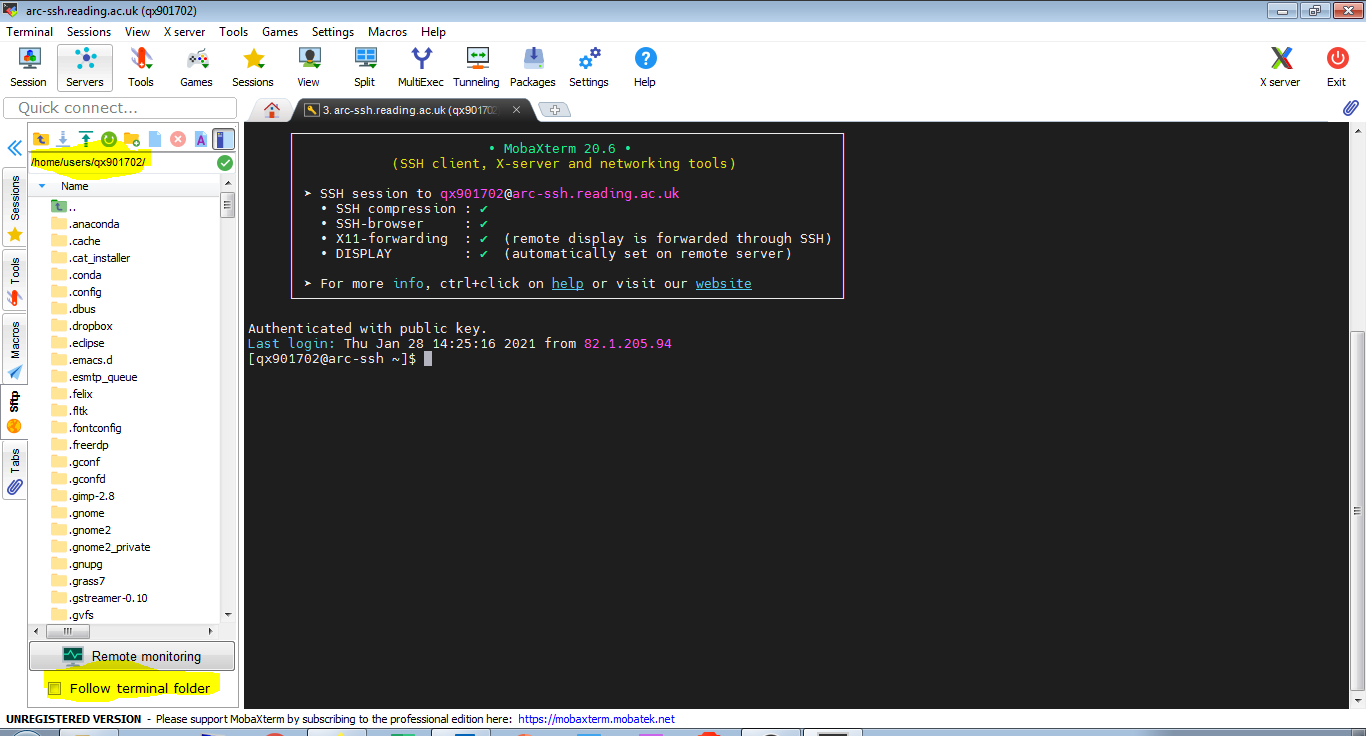
Now a connection to arc-ssh will appear in the saved sessions tab on the left hand side of the MobaXterm window. We can connect now to arc-ssh by simply clicking the connection icon (if the UoR password is already cached). Note again the sftp tab on the left in the screenshot below. It will allow file transfer between the local and the remote system. You might want to tick ‘Follow terminal folder’.
The video shows how to set up a saved session:
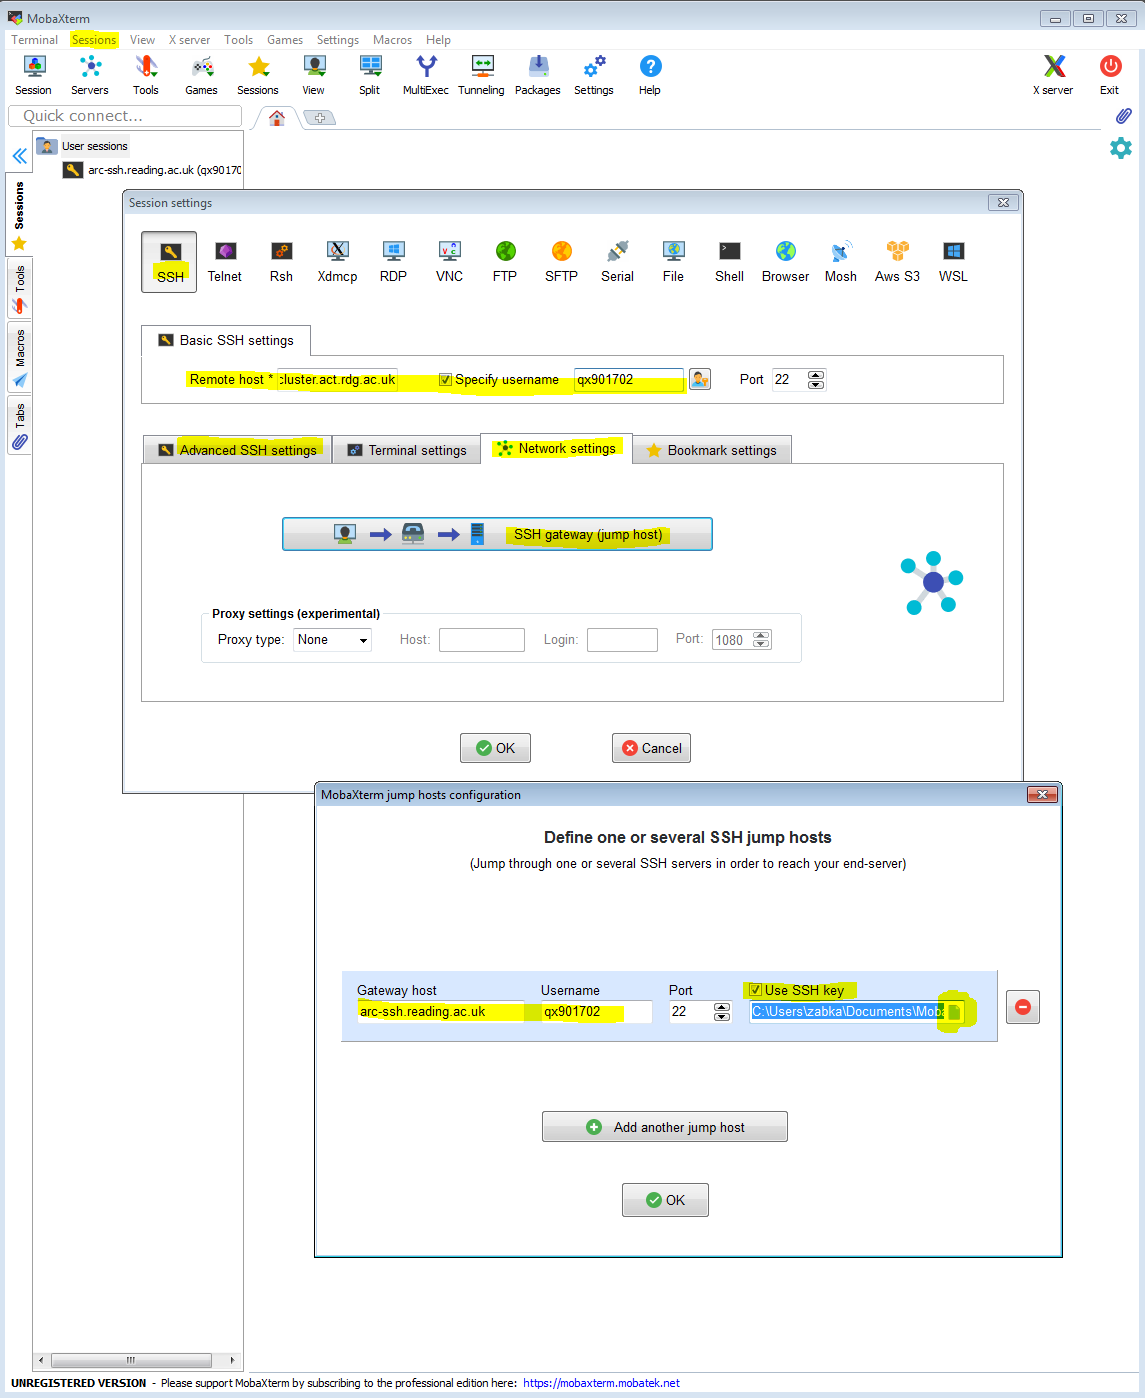
Now we will create a session that will connect to the cluster from your local machine by transparently jumping via arc-ssh. Like before, we click on ‘Sessions’ and we choose ‘New session’. In addition to the obvious settings as shown before (with the remote host being cluster.act.rdg.ac.uk in this case an not arc-ssh.reading.ac.uk), we click the ‘Network settings’ tab and we click and configure the ‘Connect through SSH gateway (jump host)’ setting. You can then set up arc-ssh as the gateway server. All settings are shown in the screenshot below. Again, it should be sufficient to tick ‘Use private key’ and the key will be found automatically.
In a similar way you can set up other connections to be made via arc-ssh, e.g you can set up a connection like this to JASMIN.
The video below shows how to set up a session to connect to the RACC using arc-ssh as a jump host:
MobaXterm allows transparently using an ssh jump host in other session types as well and later we will show an example of using it co connect to a Windows remote desktop.
Navigating the whole directory tree on arc-ssh to find your storage volume, especially when you need to find your user name in a long list of directories, can be inconvenient. Here we will set up a separate sftp session that takes you right to your chosen directory path. The first video below is just an sftp session that connects you to act-ssh and you land in the default location, in your home directory. You can take this approach if you want file browsing with more features than those provided with the sftp window attached to a terminal connection.
In the following example we copy the default act-ssh sftp session (Unix home directory), but we change the ‘remote path’ to point to a location that is not so convenient to navigate to manually. Here, we show it for SMB (Windows) shares, including your ndrive. You can do the same for /storage.
Most session types in MobaXterm have an option to transparently connect via a jump host. We already used this to connect to RACC via arc-ssh using SSH. MobaXterm has other session types and among them there is also an option to connect to a Windows desktop using RDP protocol. This is similar to using the remote desktop connection already available in Windows, but the advantage of using MobaXterm instead of the built in Windows remote desktop client is that in MobaXterm we are able to set up a connection via an SSH jump host, here via arc-ssh. We recommend this approach if you can’t or don’t want to use the VPN. In this case we will connect to rds-node1.act.rdg.ac.uk. You can replace rds-node1.act.rdg.ac.uk in this example with any other Windows machine on campus that allows you to connect to it using remote desktop.
The method shown here might be easier to set up than creating ssh tunnels and connecting with the native Windows Remote Desktop client. To get a reasonable display quality you might want to tick ‘Enhanced graphics’
SOCKS proxy can be used instead of VPN, however, it is a completely different approach. With VPN your home computer is connected to the network as if it was a part of the campus network. With a SOCKS proxy only particular applications are connected via proxy, and only these applications can access resources that are limited to the campus network.
SSH dynamic port forwarding (tunneled SOCKS proxy) is not as flexible as local port forwarding (yet another method to use SSH to access resources available only from the secure network, behind the firewall, which we do not discuss in this page), it can only be used with application that are able to talk to the SOCKS proxy. However, it might be easier to understand and set up than forwarding particular ports.
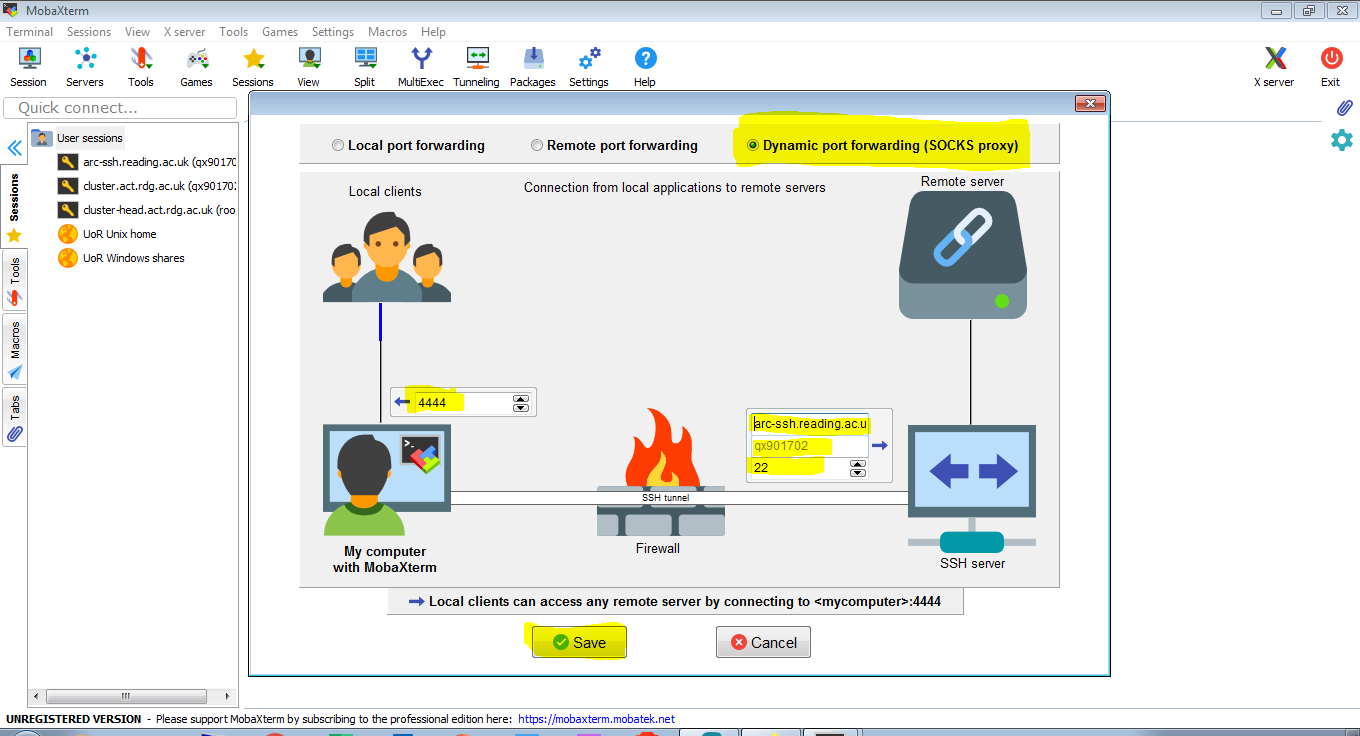
We just need to arbitrarily choose a port number to be used on your local machine. In ARC instructions we will consistently use port 4444 on the local machine for the SOCKS proxy. The ssh server, here arc-ssh, will act as a proxy server, but for security reasons we will be connecting to this proxy via an ssh tunnel. To connect to this tunnel, applications running on your local machine will be directed to connect on port 4444 on localhost (your local machine). MobaXterm allows to set up an SSH tunneled SOCKS proxy in its GUI, and it can be made to automatically start with MobaXterm – you just launch MobaXterm and your SOCKS proxy is ready to use with other applications. In the sections below, we will use this SOCKS proxy with two applications – with the NoMachine client to connect to the UoR NX service and with a web browser to browse the Web as if on campus, such that you can access web resources available only on the campus network.
The following 3 screen shots demonstrate how to create a SOCKS proxy tunnel in MobaXterm.
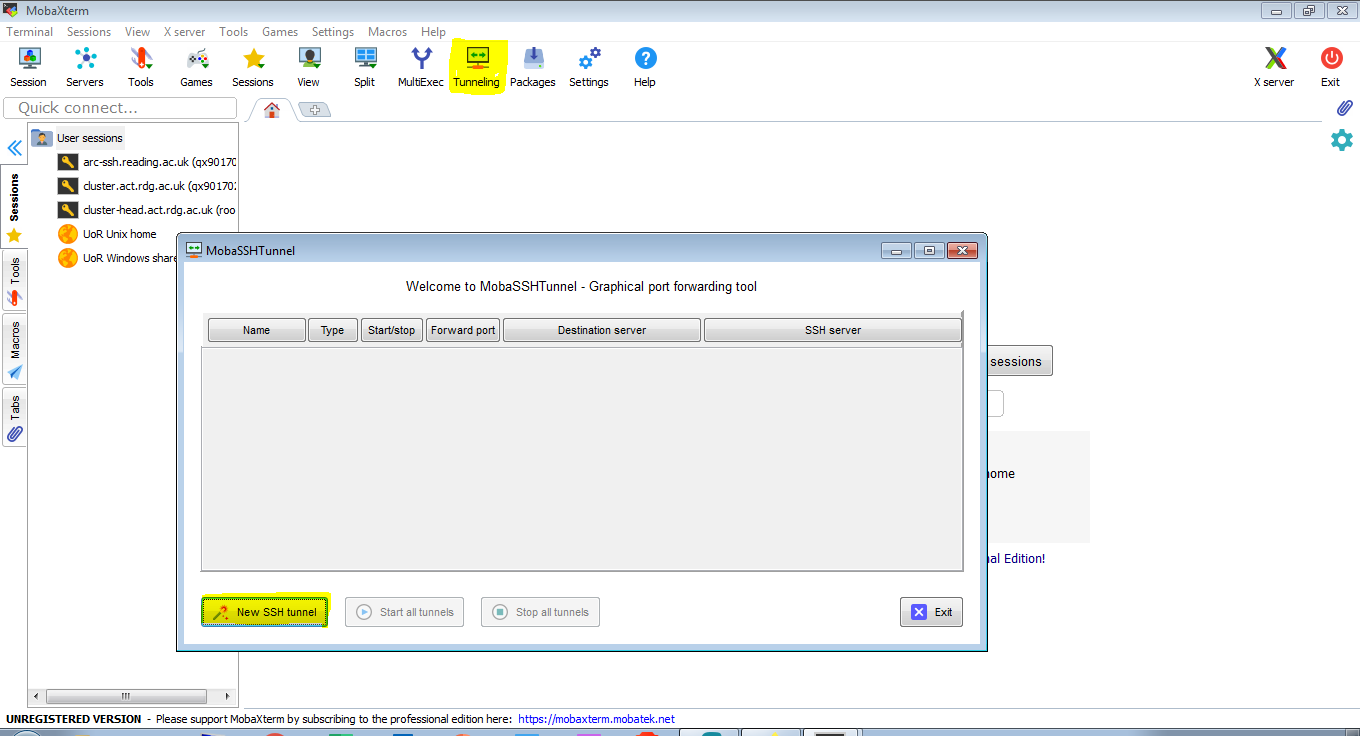
2. To set it it up we just need two pieces of information: a port number on your local machine (we use 4444) and details how to connect to the SSH service – here it is arc-ssh.reading.ac.uk, default port 22, and the user name used to login, i.e. your UoR user name.
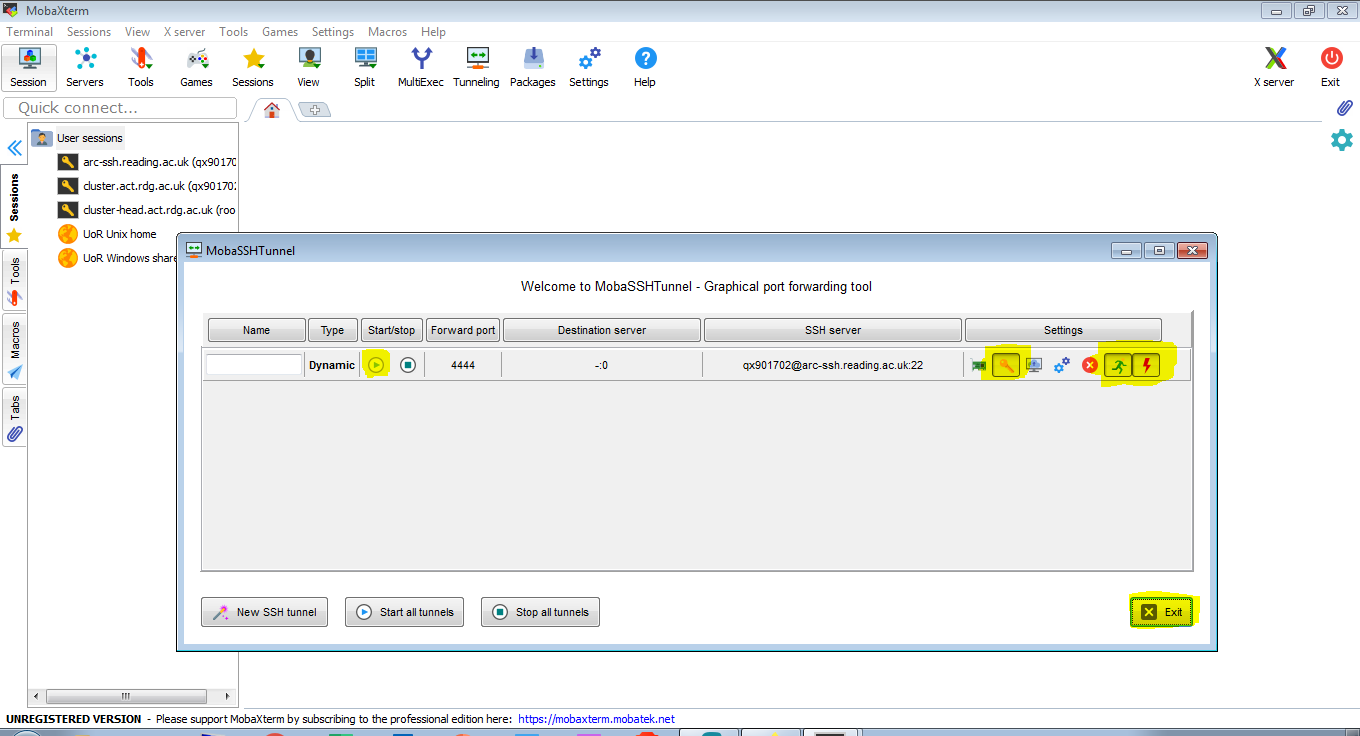
3. For convenience we select that the tunnel should connect automatically when MobaXterm starts and to reconnect when the connection is broken. We set it up to use our SSH key, so that together with caching the UoR password, the connection can be established automatically, without you having to login interactively. If there are problems with authentication, check if you have the internal ssh agent switched on (see section on SSH settings) and if you are using a recent version of MobaXterm.
The video shows how to set up your SOCKS proxy:
For instructions on how to set up the NX client to connect using the tunnel see Connecting to NX from Outside the University Campus.
Once you have the SSH SOCKS proxy set up to be started when launching MobaXterm, we can just launch MobaXterm, and then we can use the NX client to connect to nx.reading.ac.uk as if on campus. The only modification is that the NX client is configured to connect via SOCKS proxy on the local machine (localhost) on port 4444. Here we show this in the most recent version of NoMachine client (version 7). On NoMachine version 6 it looks slightly different, the proxy setting is separate for each connection, here in version 7 it is global.
To set up the connection via SOCKS proxy in NoMachine, we select Settings->Player->Security. Under ‘Proxy’, we tick ‘Use a proxy…’ and we click the ‘Modify’ button to set it up. Select the ‘Manual proxy configuration’ radio button and the ‘SOCKS proxy’ radio button and enter ‘Host: localhost and Port: 4444’. Go back to the starting (‘Machines’) screen. Once we have the NoMachine client connecting via SOCKS proxy (and MobaXterm with SOCKS proxy running), we set up a connection to nx.reading.ac.uk, and connect the same way as if we were on campus.
The procedure is shown in the video below:
In the video below we show how to use the SOCKS proxy with Firefox and its FoxyProxy Standard plug-in. Using SOCKS proxy from Firefox settings is less convenient. Here we just use the basic feature of the plug-in, you will just be able to toggle connecting via proxy on and off. However, you can also set it up so that the plug-in automatically uses proxy for specific URLs and no proxy for other URLs. This means that you can automatically use the proxy only for *.rdg.ac.uk (UoR internal sites), and maybe also for *.reading.ac.uk (these should be accessible externally, but there are exceptions), but other sites like e.g. youtube.com will connect directly without using the proxy.
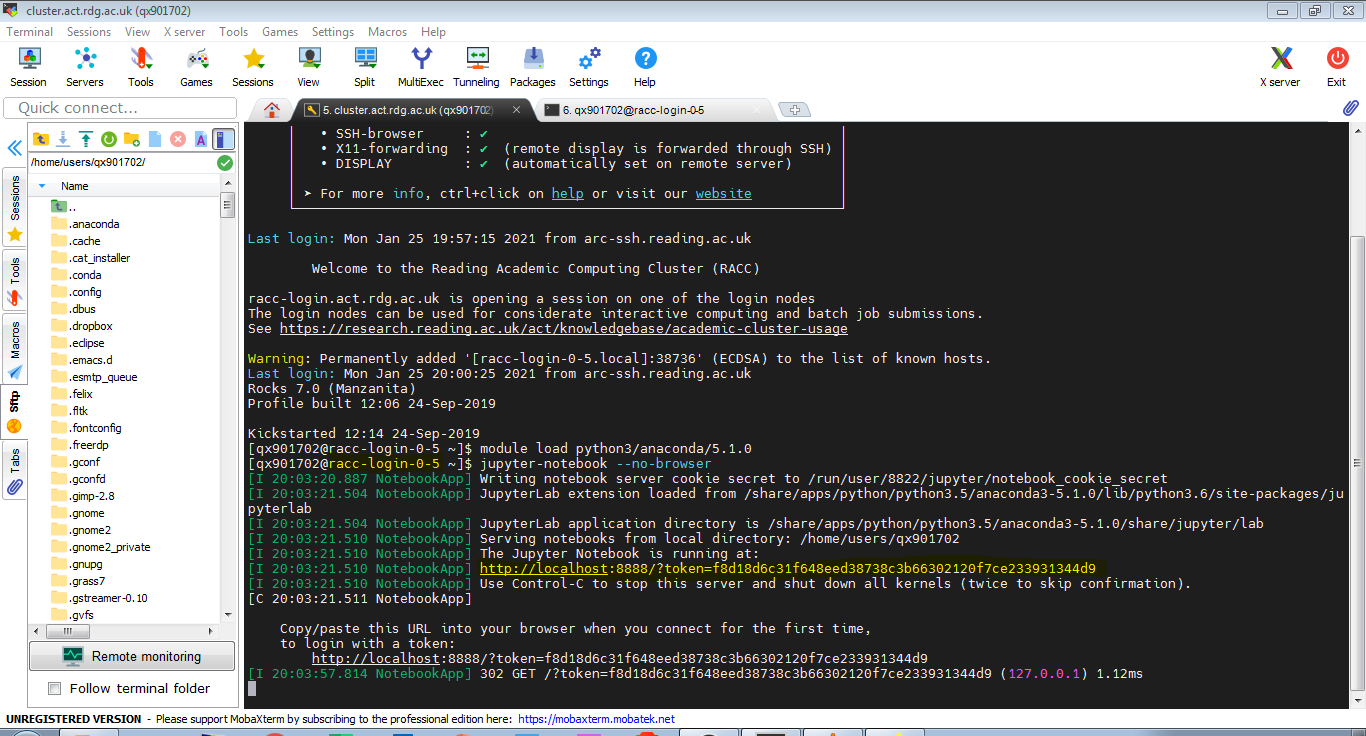
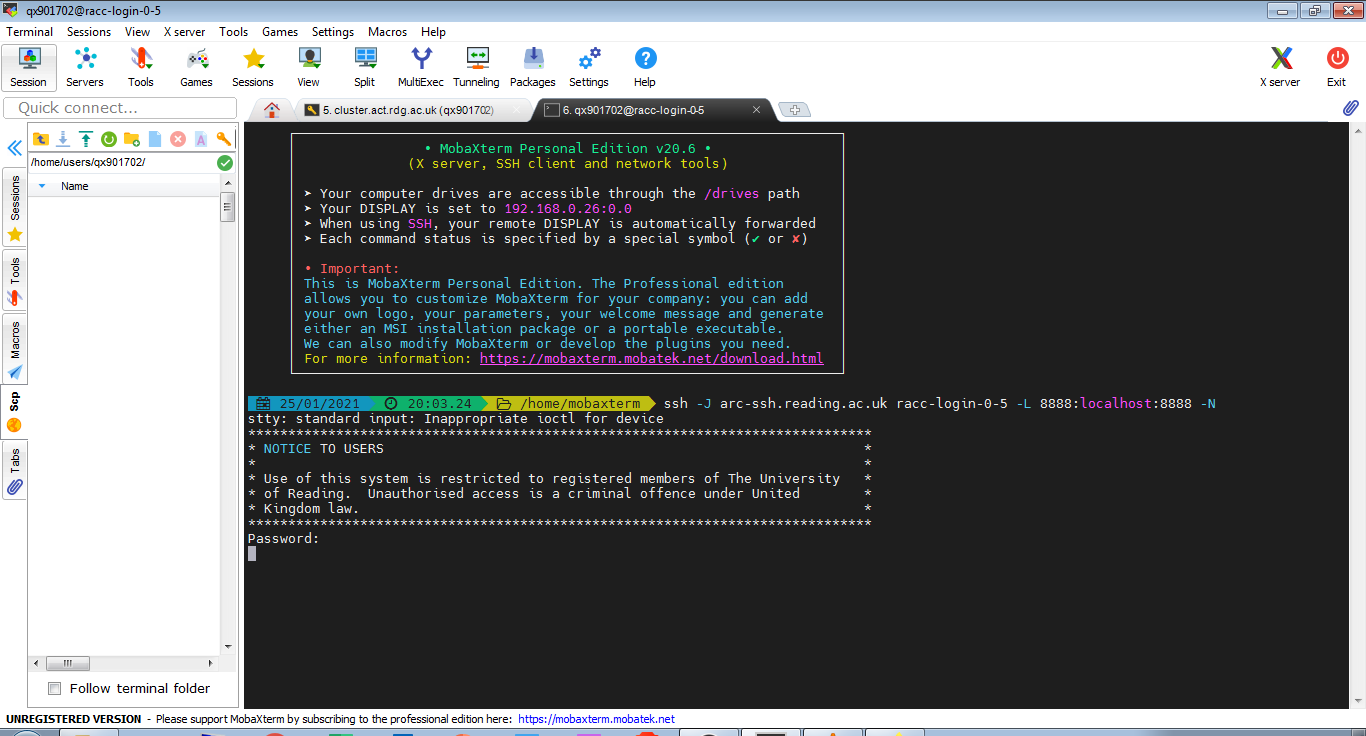
This procedure is already described in the article Jupyter Notebook on RACC via ssh tunnel. Here we just show it in MobaXterm, using configured ssh key authentication to arc-ssh and preconfigured ssh session on RACC. Let’s click our saved cluster session from Section 3. We are connected to one of the RACC login nodes, in this case it is racc-login-0-5. Let’s launch Jupyter Notebook. Note the hostname of the login node (in the form racc-login-0-X), and the port number for the Jupyter Notebook connection, we will need it in the next step.
In another tab we create the ssh tunnel with the command in the screenshot below. (You might need to specify your user name if you are connecting from a private device e.g. use -J qx901702@arc-ssh.reading.ac.uk)
Now we can copy and paste the link obtained when launching Jupyter Notebook in the first tab into the web browser on our local machine. Remember to toggle off arc-ssh SOCKS proxy in FoxyProxy (if you set this up like in the section above).

And now we have launched our Jupyter Notebook on the local machine. Note that the URL changes to one that does not reveal your secret token any more. It is important to keep your secret token secret. It is also important that you close any unused Jupyter Notebook sessions, they are open connections to your UoR account!

This procedure is also shown in the video: