New: Academic Computing Drop-in Sessions
Academic computing drop-in sessions are now run by members of our team on Wednesday afternoons! Head to our drop-in info page for details & schedule....
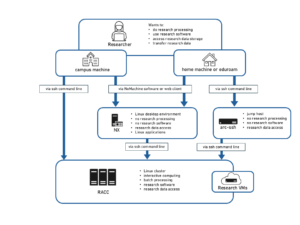
 Externally visible ssh server – arc-ssh
arc-ssh.reading.ac.uk is an externally visible ssh server. It exists to allow access to the UoR network and Linux-related resources from off-campus. Typical applications include accessing the Reading Academic Research Cluster (RACC), copying data using tools like sftp, scp or rsync, and secure access to other campus services via tunneled SOCKS proxy or port mapping.
To access arc-ssh you will need to use an ssh client, such as e.g. MobaXterm, a Mac or Linux Terminal or similar. The following ssh command is used to log in to arc-ssh, substituting <UoR login> with your username.
[janedoe@homepc] ➤ ssh <UoR login>@arc-ssh.reading.ac.uk
If you are not registered to use arc-ssh you will not be granted access when you attempt to login from off-campus. After you enter your UoR password into arc-ssh and it is verified, if you are not registered to use the service you will see a message like the following example:
[janedoe@homepc] ➤ ssh <UoR login>@arc-ssh.reading.ac.uk
Password:
<UoR login> not registered to use this service
If that happens you need to raise a ticket to DTS and you be added to the group arc-remote-users group (for all Linux ARC remote access services, unless there is a specific requirement access is limited to arc-ssh). You should only use your UoR email address or the self-service portal to apply for access, so that we can confirm that the request comes from you. In some cases further checks that the request is genuine might be needed.
When connecting from the UoR campus network, you will be allowed to login to arc-ssh without registering.
Assuming you did not yet set up Google Authenticator or ssh keys (see below), after you successfully authenticate with your UoR password, you will be prompted to enter a one-time email code, like in the following example:
[janedoe@homepc] ➤ ssh <UoR login>@arc-ssh.reading.ac.uk -X
Password:
The code received by email (timestamp 20:37:57):

[<UoR login>@arc-ssh ~]$
You just need to copy and paste the 6 digit code you find in the email that has just been sent to your UoR email account. Note that the code is valid only for this particular email code authentication prompt and that it times out eventually. The timestamp can help to ensure that you use the right code. It makes sense to have your email client already opened and be ready to copy the code. If you do not manage to enter the email code in time, the session will time out. You will need to enter the UoR password again, you will receive another email with a new code, and you will be expected to enter this new code.
Note that on a Linux you might not get asterisks (*) printed when you type the password or the email code.
New users of UoR Linux systems can stop here and just use the email codes to login to arc-ssh. However, we recommend that all users, once they have some experience in using our systems, set up a more robust second-factor authentication. The following two methods of authentication will replace the email code authentication. If you set up Google Authenticator, it will disable the email codes. SSH keys can be used in addition to either the email codes or Google Authenticator. When a correct ssh key is present, you will not be asked for an email code or verification code, but you still will be able to use an email code or Google verification code if you do not have the right private key on the client device, e.g. when you use a different computer to connect, not the one on which you have stored the ssh key.
Setting up ssh key authentication allows to automate the second part of the login process. It can be used e.g. on your home machine, while you still will be able to login using one time codes, either sent by email or generated by Google Authenticator, when connecting from other machines. You need to generate an ssh key pair on your local machine and place the public key in your .ssh/authorized_keys file in your UoR Unix home directory. Below are short instructions that are not specific to any particular operating system and ssh client. We repeat these steps in the more detailed instructions for MobaXterm users (with videos) and for Linux or Mac users.
Let’s generate the ssh key first. When we run the following command, we will use the default file name and we will not set the passphrase here (because we use two factor authentication anyway). The ssh key pair is generated simply with:
[janedoe@homepc] ➤ ssh-keygen
This generates a private (for your machine) and a public key (for the remote machine). In order to use those keys to authenticate, the public key has to be copied from your machine to arc-ssh. The easiest way to do that is by using the ssh-copy-id command below. We recommend that you use this method as it automatically adds your public key to the right file and, if needed, it corrects the relevant directory and file permissions as required. When running this command you will need to connect to arc-ssh, and you will need to login with two factor authentication. As this login cannot be not be authenticated with your new ssh key yet, it will be authenticated either with an email code (like in section 2) or with Google Authenticator verification code if you set this up already (see section 4). Note that if you specify a non-standard name for your private key, you will need to explicitly provide this name with the ssh-copy-id command (and later with the ssh command as well). This is only recommended for experienced linux users who are familiar with ssh keys.
[janedoe@homepc] ➤ ssh-copy-id <UoR login>@arc-ssh.reading.ac.uk
Password:
The code received by email (timestamp xx:xx:xx):
Once the public key (matching with the private key stored on your device) is transferred to arc-ssh, ssh key authentication will replacethe one time code authentication:
[janedoe@homepc] ➤ ssh <UoR user name>@arc-ssh.reading.ac.uk -X
Password:
Authenticated with public key.
[<UoR login>@arc-ssh ~]$
Once Google Authenticator is configured, by running the setup script below on arc-ssh, prompting for the Google Authenticator verification code will replace prompting for and sending email codes. We recommend to replace email codes with Google Authenticator codes because email is not a reliable way to deliver the authentication code on time. There is a risk you might not be able to login when there is some delay with your email delivery. (Note that using ssh key as shown in the previous section is also a good way to make sure you do not rely on the email codes when you connect from a trusted machine).
The general idea of Google Authenticator is as follows: A secret key is placed in a file on the server. On the ACT systems using this method of authentication the file is located at /var/authenticator/<UoR username>/.google_authenticator. The secret key is also transferred to your mobile device when you scan the QR code (you can also achieve this by copying the secret key by hand, or by using the URL to have the QR code displayed in a web browser), and it is stored in the authenticator app. The secret key plus the current time is used to generate time based verification codes. Comparing those verification codes confirms the identity of the device used to authenticate the connection.
You need to install the Microsoft Authenticator app (this is recommended because it is already used with other UoR services) or the Google Authenticator app on your phone. Both the Google and Microsoft apps are compatible with the Google Authenticator service and the following setup steps are the same in both cases. Once the app is installed, run the configuration script below on arc-ssh. The script will produce a QR code that allows to transfer the secret to your mobile device without having to copy the long code manually. In the app, you will need to scan the QR code displayed on the computer screen. If you have problems with the QR code displayed in the text console, you can use the provided URL, or you can copy the secret key as text. The configuration script is modified to store the Authenticator files locally on arc-ssh, not in your shared home directory, so that setting it up on arc-ssh will not affect how you login to other UoR services. Note that every time you run the script, a new secret code is created and the old one is overwritten. That means that each time you run the script, you need to scan the QR code again.
In the following example, we first login to arc-ssh using the email code (see section 2) as the second authentication method. Once we are connected to arc-ssh, we run the script which replaces the email codes with Google Authenticator.
[janedoe@homepc] ➤ ssh <UoR login>@arc-ssh.reading.ac.uk -X
Password:
The code received by email (timestamp xx:xx:xx):

[<UoR login>@arc-ssh ~]$ google-authenticator
Warning: pasting the following URL into your browser exposes the OTP secret to Google:
https://www.google.com/chart?chs=200x200&chld=M|0&cht=qr&chl=otpauth://totp/qx901702@arc-ssh.reading.ac.uk%3Fsecret%3D27DEDDS2OPLD7LBL3KKU2ZPIKQ%26issuer%3Darc-ssh.reading.ac.uk

Your new secret key is: 27DEDDS2OPLD7LBL3KKU2ZPIKQ
Your verification code for code 1 is 367461
Your emergency scratch codes are:
  81427850
  28709993
  77729003
  73219531
  80982761

[<UoR login>@arc-ssh ~]$
It makes sense to save a copy of the emergency scratch codes. You can use them in case you are not able to login with the standard, time based, verification codes.
The URL, the QR code and the secret key contains the same secret, they should not be revealed, printed or stored in a file. I have removed my /var/authenticator/qx901702/.google_authenticator after running this example, such that this secret is not valid anymore.
Now, when you login, you will be prompted for the verification code from the app, not for the code sent by email:
[janedoe@homepc] ➤ ssh <UoR login>@arc-ssh.reading.ac.uk -X
Password:
Verification code:

[<UoR login>@arc-ssh ~]$
In case you want to revert to using email codes, you will need to log in to arc-ssh and remove the file /var/authenticator/<UoR login>/.google_authenticator.
![]() Transferring files to and from Linux storage
Transferring files to and from Linux storage
![]() Recover a file on research storage
Recover a file on research storage
![]() Access to ACT Servers via an SSH Client
Access to ACT Servers via an SSH Client
![]() Running Matlab Scripts as Batch Jobs
Running Matlab Scripts as Batch Jobs
![]() Cronjobs on the Academic Computing Cluster
Cronjobs on the Academic Computing Cluster
![]() Python on the Academic Computing Cluster
Python on the Academic Computing Cluster