Why make Specimens?
There are a number of reasons we make specimens of plant material.
Firstly, well made and labelled herbarium specimens provide valuable records and proof that a plant was growing in a particular place at a given time for conservation and research needs, including the cataloguing of biodiversity. They also provide a resource to identify further specimens by effective matching. Specimens can be sent away through the post to experts for identification. This has become more common with the increasing need of environmental impact assessments before the start of construction projects. Also, specimens provide a source of plant material for taxonomic and botanical research. Samples from herbarium specimens are routinely used for leaf anatomy, phytochemical screening, pollen studies, DNA extraction, the production of Floras, field guides and monographs. Finally, collecting plant material is a good way to learn the names and characteristics of plants, beside being an interesting hobby which takes you out and about.
How to make a Specimen
Before collecting and producing a specimen, it is imperative to consider the conservation of plants. The herbarium staff have produced a document outlining points that collectors should consider if, and when, collecting specimens.
This document is available for download here.
Once our specimen has been selected we can proceed with preserving it for later examination, which is usually 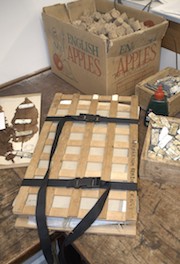 done via a drying process . To avoid too much discoloration, quick drying is needed. This also prevents the development of mould or continued abnormal growth of the specimen.
Specimens are best laid out in ‘flimsies’. These are made of thin, strong paper which allows the water to pass through easily. These flimsies are sandwiched between drying papers (e.g. old carpet underlay, blotting paper). The presses should be opened and the drying papers changed daily if a specialist drying cabinet is not available. In wet conditions it is often difficult to get the drying papers dried for reuse.
In the tropics, drying by small paraffin stoves is often employed.
After being in the press for a few hours, it is a good idea to open the press and check and rearrange the specimens if necessary, before they dry and become too brittle. After this, the flimsies are not opened until it is thought the specimens may be dry. This is determined by their rigidity and whether they feel cold to the touch. Straps should be well tightened and retightened as necessary.
Not all plants, or parts of plants are suitable for pressing. These include:
- Flowers and fruits
- Seeds and wood samples
- Halophytes and hydrophytes
- Mosses, liverworts, lichens and other bryophytes
- Fungi
Creating a Herbarium Sheet
The plant should be mounted on a standard herbarium size sheet of cartridge paper measuring 16½ x 10½ in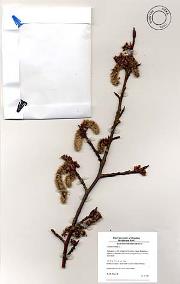 (41.9 x 26.7cm) supported by corrugated cardboard, using PVA to make effective ‘glue staple’ at appropriate points of the stems. Using small lead bars to weigh the plant down will help make the bond firm.
The label should always be glued at the bottom right corner. Other items such as a small map, or photograph are always useful.
Large seeds and reproductive parts can be attached in a small envelope.
In the image to the right, we can see the perfect specimen sheet, with the appropriate points of the stems glued down, the label in the bottom right hand corner, and the specimens reproductive parts have been affixed in a suitable sized envelope.